Do you want to add collapsible sections to your Google Docs document to make navigating easier?
This can be especially useful if your document is large.
Unfortunately, Google Docs does not have a built-in feature for collapsible sections.
However, there is an alternative method that can make navigation even easier than collapsible sections.
In this article, we will show you how to use this alternative method to improve the navigation of your documents in Google Docs.
Also read: (opens in new tab)
How to Jump to a Page in Google Docs
How to Merge or Combine Google Docs
How to Rearrange Pages in Google Docs
How to Remove Footnotes in Google Docs
Google Docs Collapsible Sections
Step 1: Click on “View” and select “Show outline”
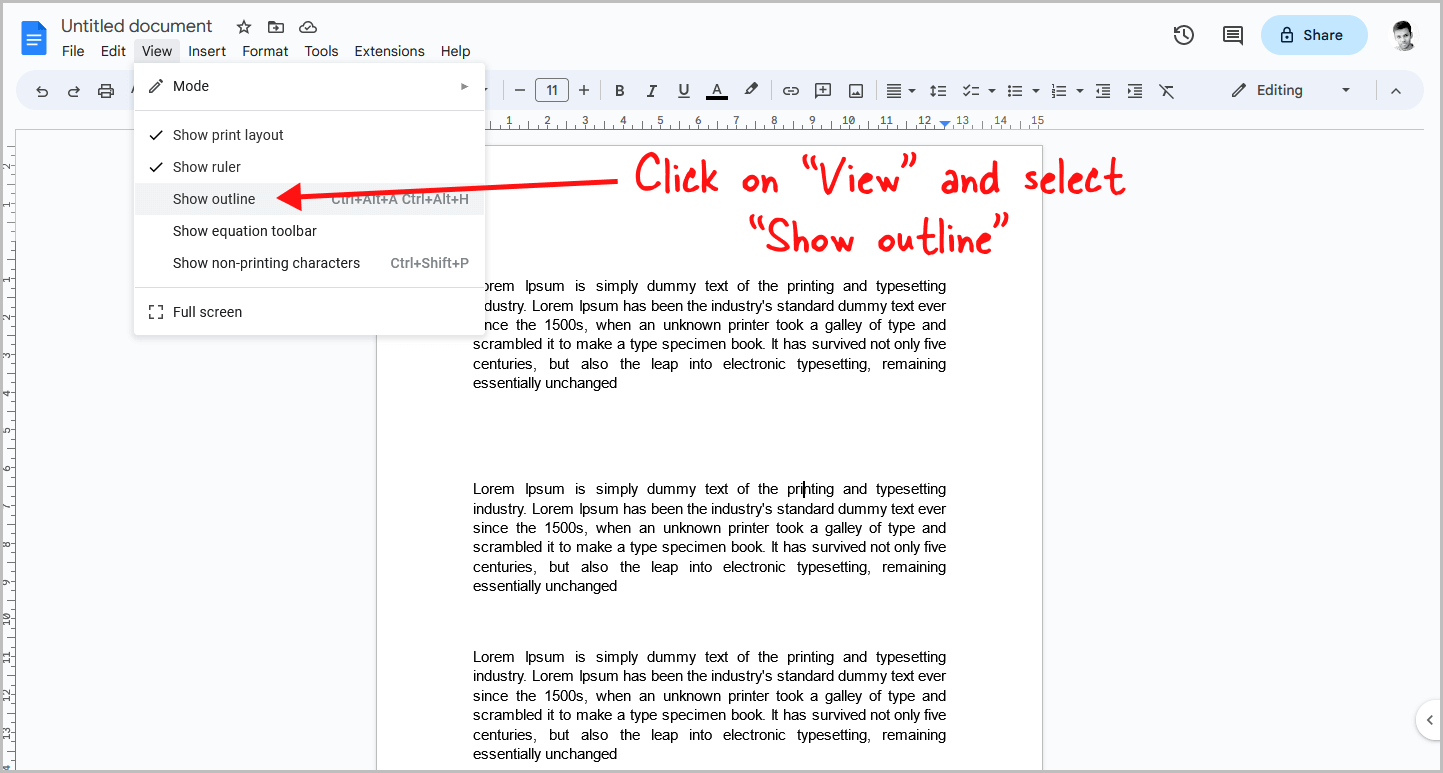
Since there is no option to add collapsible sections in Google Docs, we’ll use the “Outline” feature instead.
Update: Google Docs has added a feature to include collapsible headings. To learn more, jump to this section.
This feature makes it easy to navigate large documents.
Enabling the “Outline” feature in Google Docs adds a panel to the left side of the screen, allowing you to jump to any section with ease.
This is helpful for both you and your readers.
To enable the “Outline” feature, open the document and click on “View” from the top menu.
Then, select “Show outline” from the drop-down menu.
Make sure the checkmark symbol appears next to the option.
If the outline feature is already enabled, you can proceed to the next step.
Step 2: Add a section heading
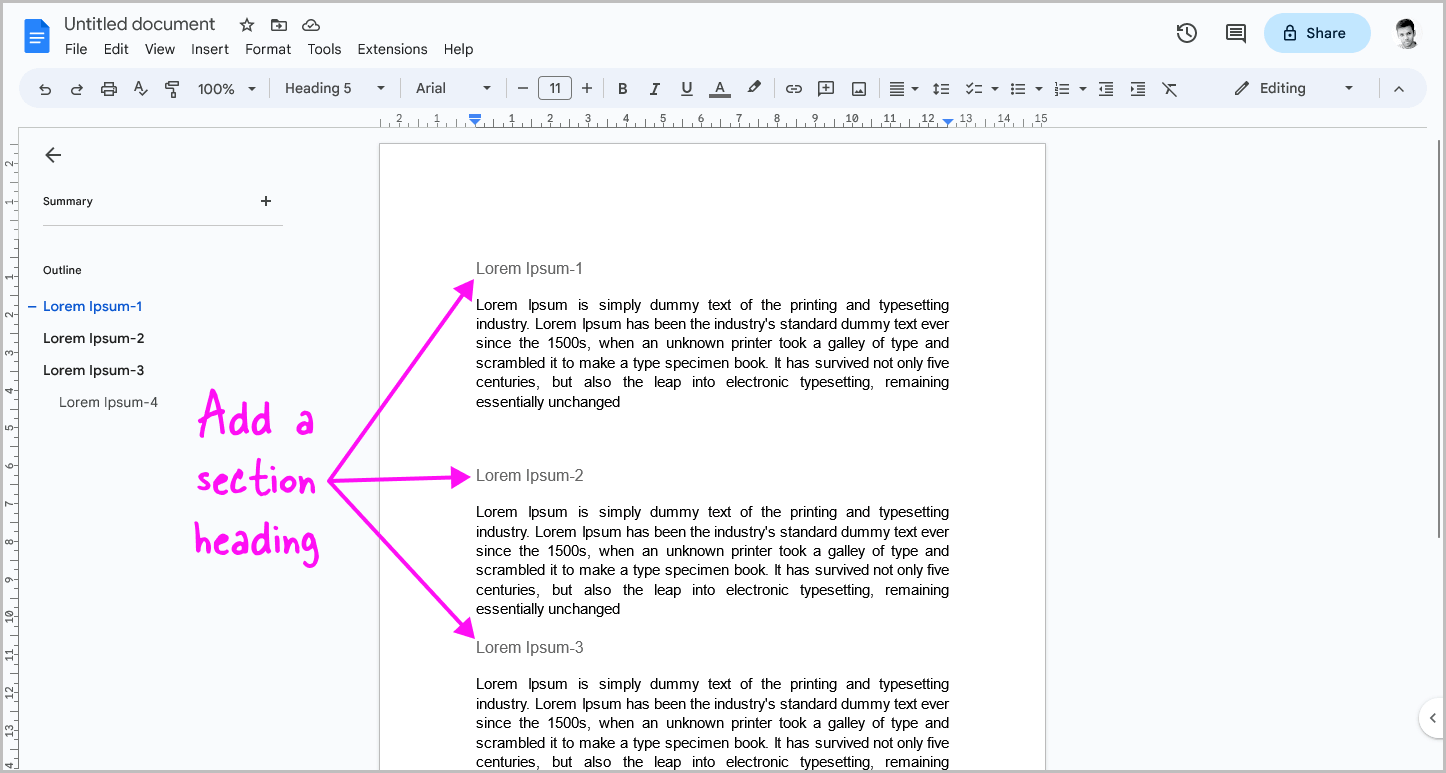
After enabling the outline feature, you’ll see a panel on the left side of the screen.
The outline panel features just the “Headings” from the document, which makes it a great way to navigate through your document.
With the outline panel, you can quickly jump to the section that you want to read or edit.
To use the outline panel, you need to add headings to your document.
To do this, simply add a heading to your section, select the heading, and click on Format > Paragraph styles > Choose a heading.
Update: Google Docs has added a feature to include collapsible headings. To learn more, jump to this section.
This will give your section a heading, which will then appear in the outline panel.
If you want to create a nested section, you can do so by using different heading levels.
For example, you can use Heading-2 to create a primary section, and then use Heading-3 to create a secondary section within that primary section.
This can be helpful if you want to organize your document into different levels of hierarchy.
If you don’t want to use any nested sections, you can simply use Heading-5 for all of your headings.
This will still allow you to use the outline panel to navigate through your document while keeping all of your sections at the same level of hierarchy.
Step 3: Format the heading
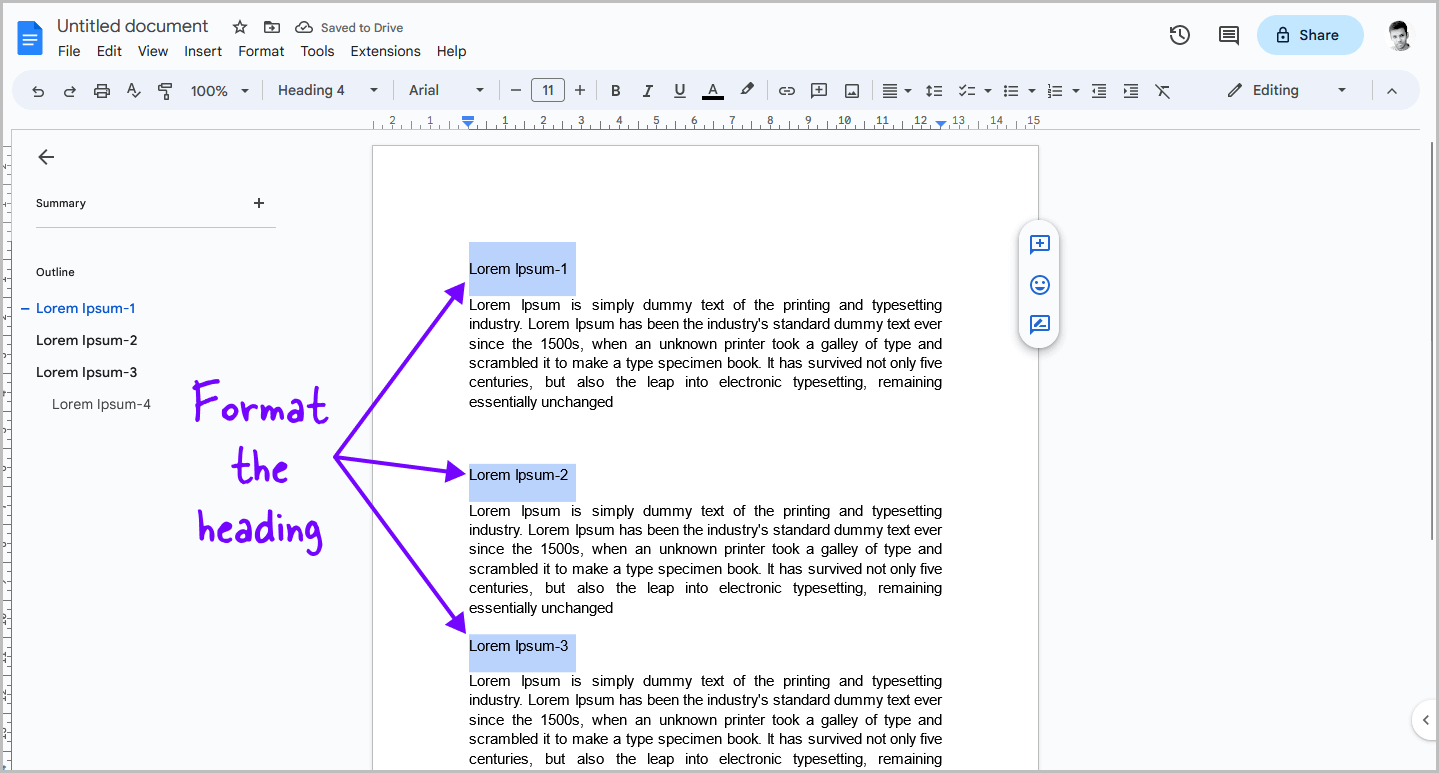
In this section, you’ll notice that the heading stands out because of its different color and size.
If you’re satisfied with the current format, you can proceed to the next step.
However, if you’d like to make changes to the headings, you can easily do so by selecting the heading and adjusting the text color and size.
You can easily adjust the size of the text regardless of the selected heading level, which allows you to maintain a consistent format throughout the document.
Suppose you have multiple headings with the same level, and you want to modify the size and color of all the headings in the document.
In that case, you don’t have to manually select each heading and format it.
You can select the first heading, right-click on it, and choose “Format Options” from the context menu.
Read this guide for a detailed tutorial with screenshots.
Then, select “Select all matching text,” which will select all the headings similar to the selected one.
Now, you can adjust the font size and color from the toolbar, which will automatically format all the similar headings in the document.
This feature can save you a considerable amount of time and effort.
Step 4: Use the outline panel to navigate
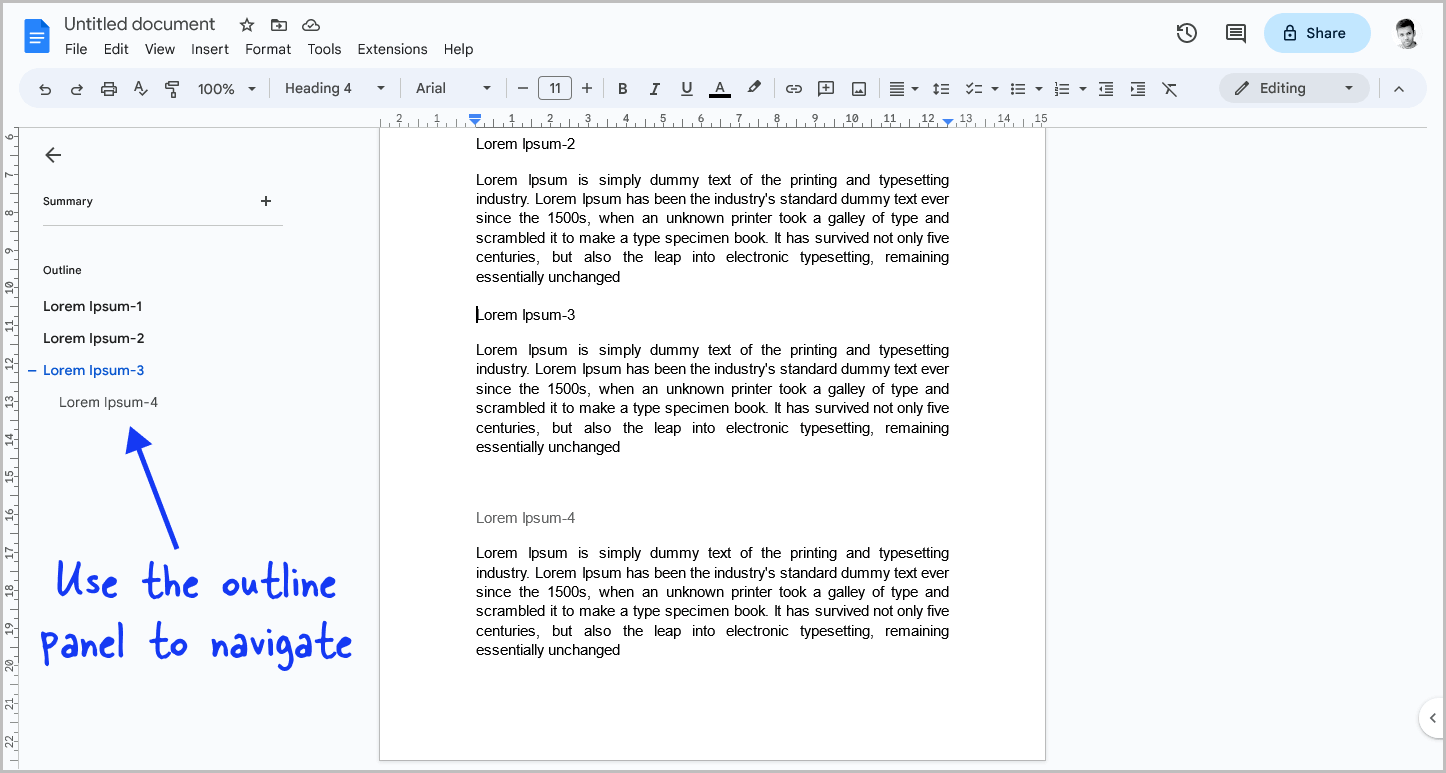
After formatting the headings, you can use the outline panel to easily navigate through the document.
Additionally, if you come across a heading in the panel that you do not need, you can quickly delete it by hovering your cursor over the heading and clicking on the “x” icon next to it.
This will remove the heading from the panel.
Collapsible Headings Google Docs
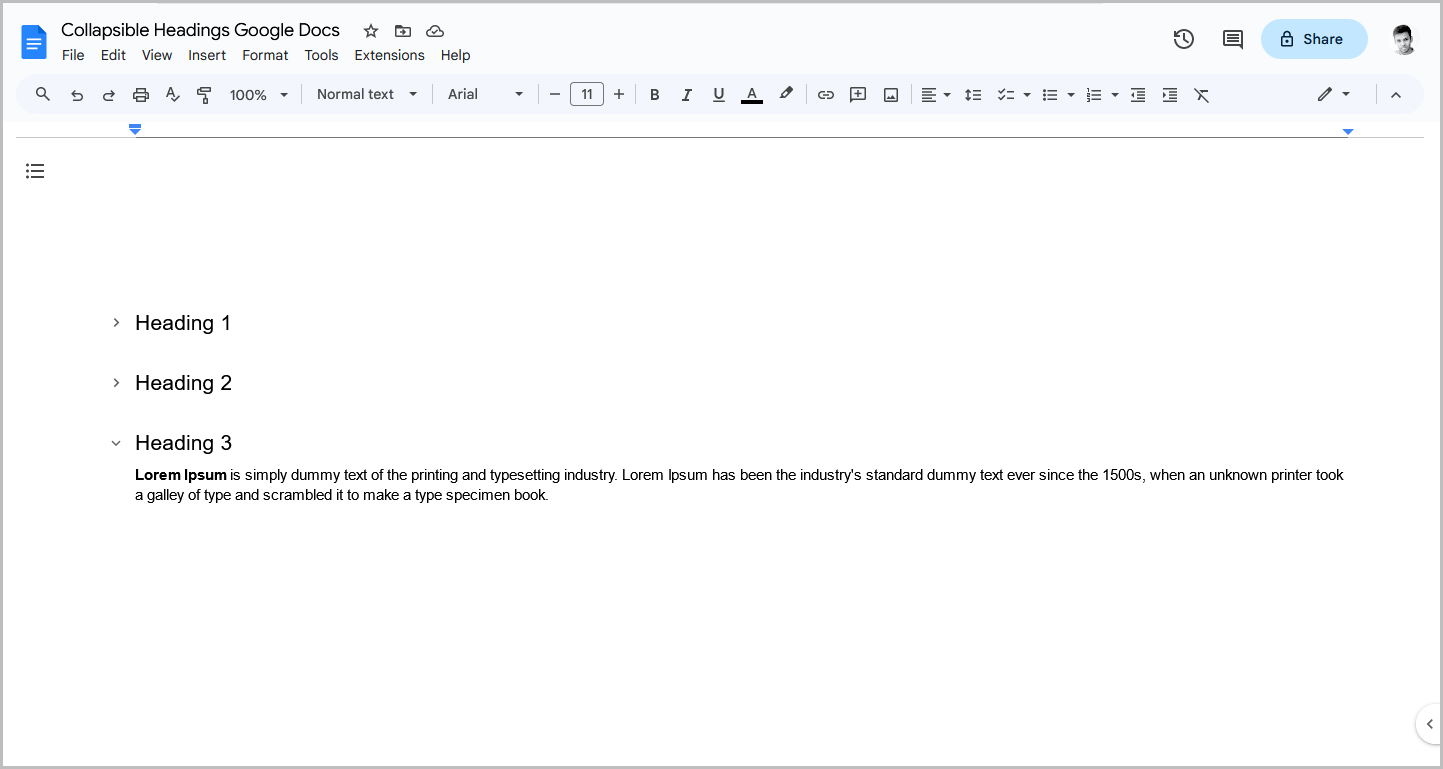
Here’s how to make collapsible headings in Google Docs:
- Go to File > Page setup.
- Select “Pageless” and click “OK.”
- Enter a heading into the document.
- Add text below the heading.
- Click on the “Collapse arrow” next to the heading.
FAQs
Can You Collapse Sections in Google Docs?
No, Google Docs does not have a built-in feature for collapsible sections. However, you can use the “Outline” feature to make navigation easier.
How to Collapse Sections in Google Docs?
Google Docs does not have a built-in feature for collapsible sections, but you can use the “Outline” feature to make navigation easier.
Collapse Headings in Google Docs
Google Docs does not have a built-in feature for collapsing headings, but you can use the “Outline” feature to easily navigate through your document.
How Do You Add Collapsible Sections in Google Docs?
Google Docs does not have a built-in feature for collapsible sections. Instead, you can use the “Outline” feature to make navigation easier by enabling it and adding headings to your document.
Does Google Docs Have a Toggle Feature?
No, Google Docs does not have a toggle feature.
Conclusion
Adding collapsible sections to your Google Docs document is not possible. However, you can use the “Outline” feature to make navigation easier.
Here are the steps to create collapsible sections in Google Docs:
- Click on “View” and select “Show outline”
- Add a section heading to your document
- Format the heading to make it stand out
- Use the outline panel to navigate through your document
By following these steps, you can easily navigate through your document and find the section you need.

