Do you want to learn how to make a newspaper on Google Docs?
Perhaps you have a newspaper project at hand and need help figuring out where to begin, or maybe you’re working on a school assignment.
Rest assured, making a newspaper on Google Docs is absolutely feasible!
This easy-to-follow tutorial will show you exactly how to make a newspaper on Google Docs.
Also read:(opens in new tab)
How to Switch Back to the Old Layout in Google Docs
How to Make Yourself Anonymous on Google Docs
How to Select Multiple Images in Google Docs
How to Hide Version History in Google Docs
How to Make a Newspaper on Google Docs?
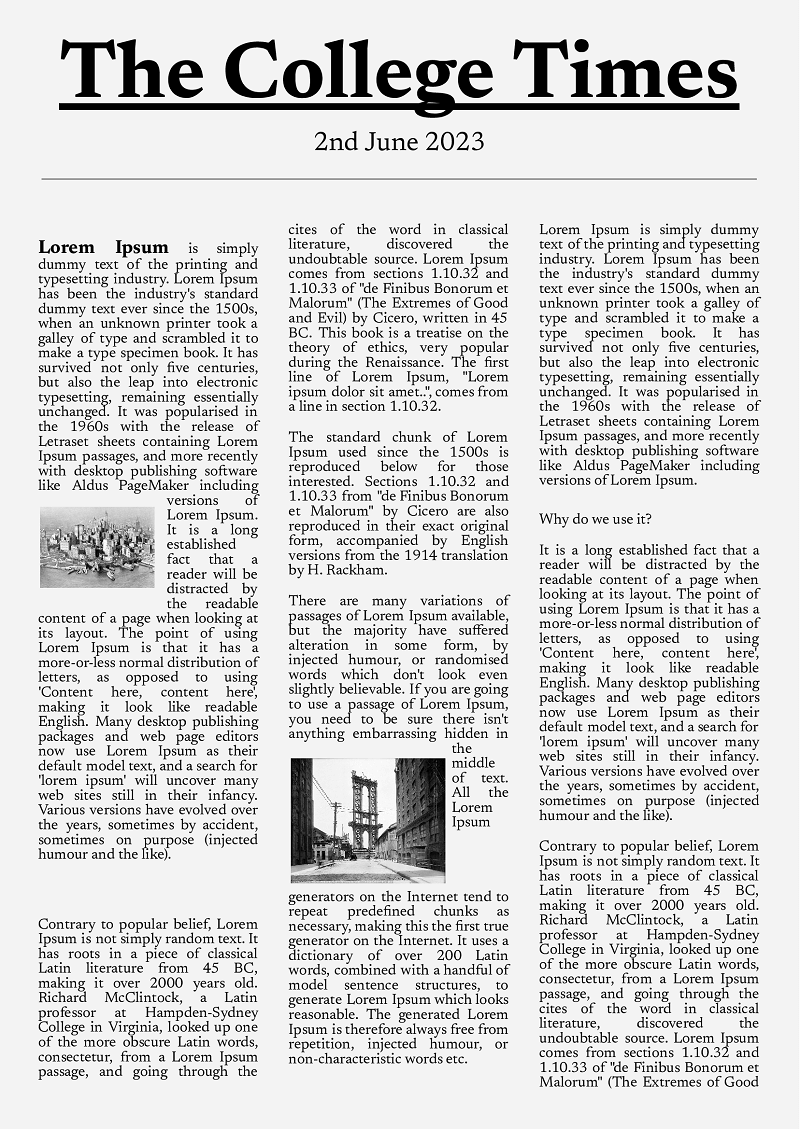
Step 1: Choose A4 paper size, set 1 cm margins
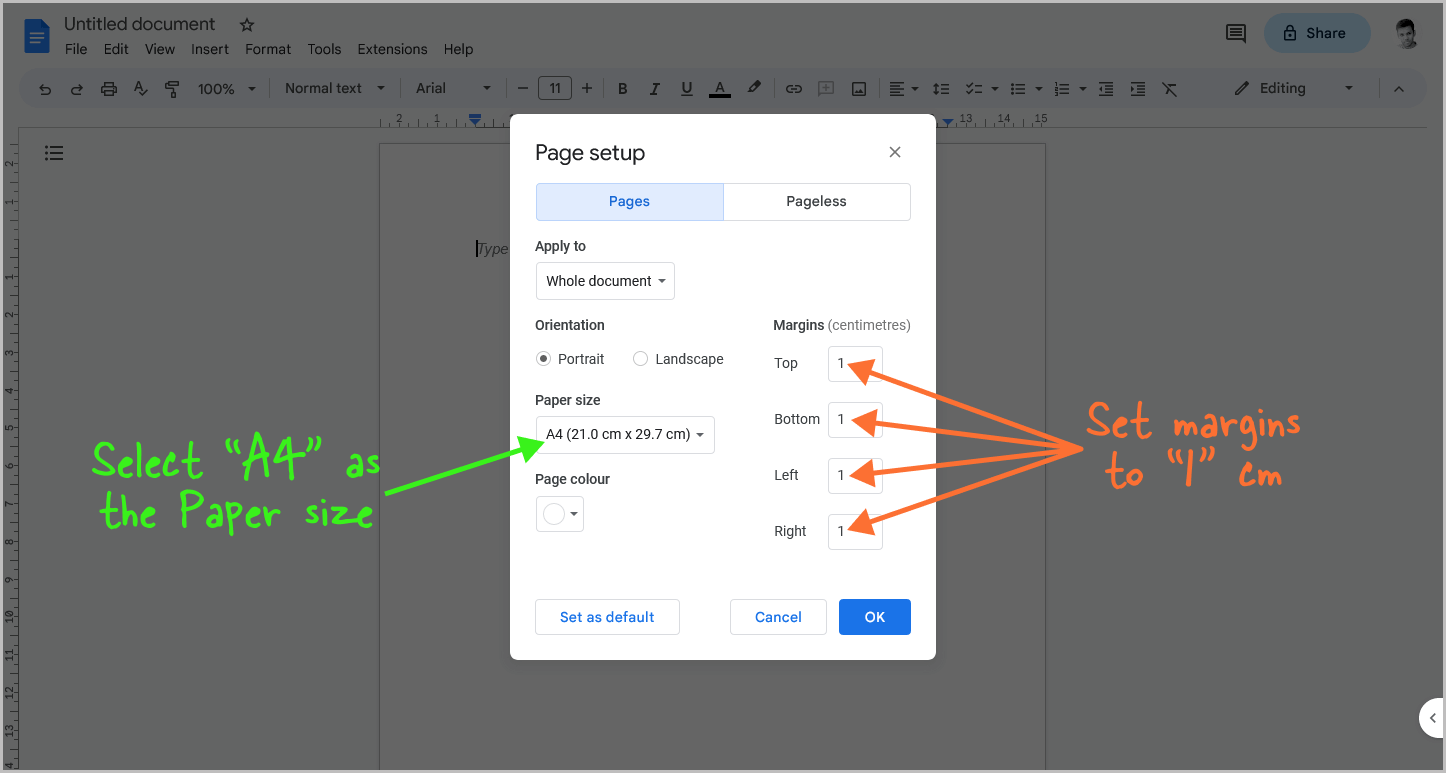
To begin, open a blank document in Google Docs.
Once the document is open, navigate to File > Page setup.
In the Page setup window, select “A4” as the Paper size and adjust the top, bottom, right, and left margins to “1” cm.
Click OK to confirm and proceed to the next step.
Additionally, if desired, you can modify the paper color within the “Page setup” settings.
Step 2: Go to Format > Columns > Choose 3 columns
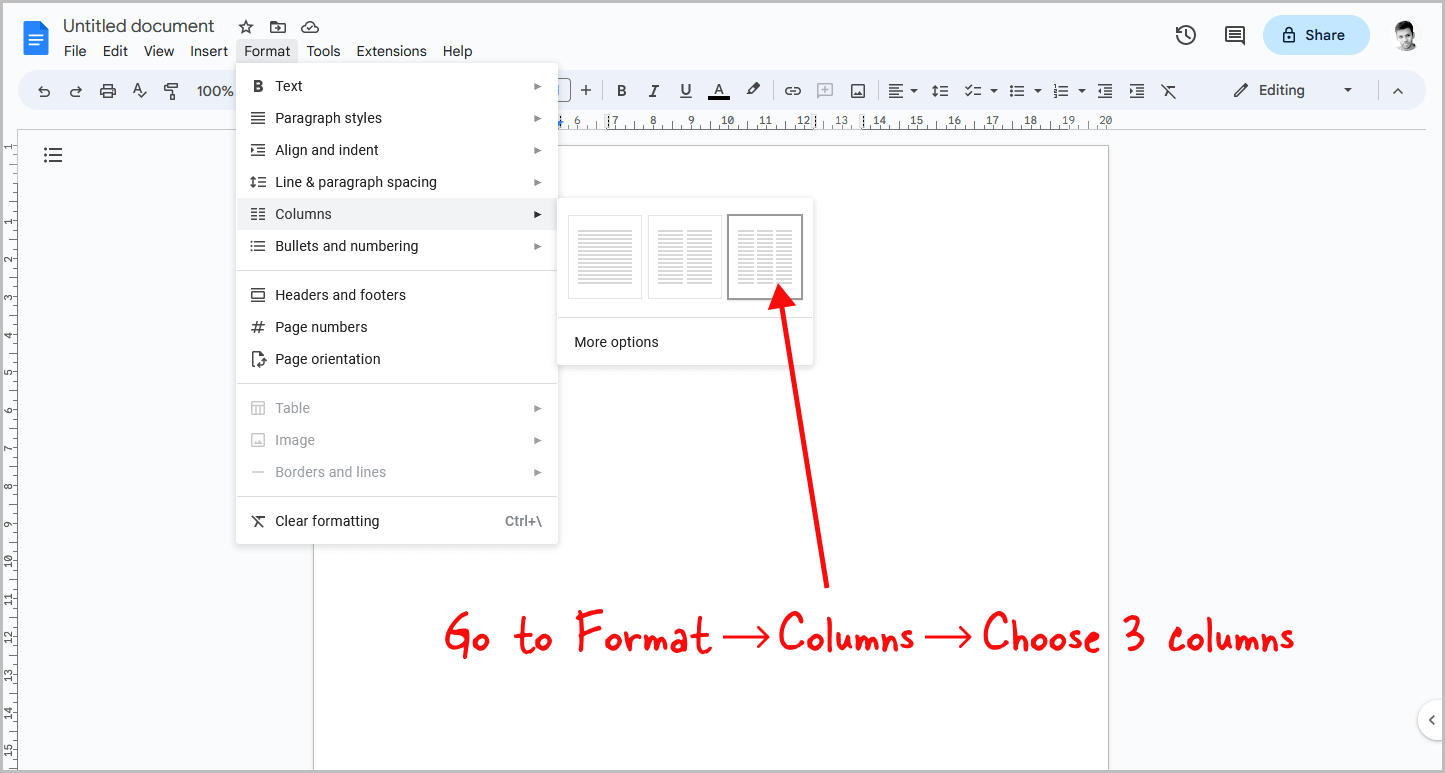
Now, locate and click on the “Format” option in the top menu.
Then, choose “Columns” and select the three-column layout.
Typically, newspapers feature three columns, although you can opt for two columns if desired.
Keep in mind that three columns is the maximum number available in the default settings.
However, if you wish to have more than three columns, you can refer to this guide: How to Make Four Columns in Google Docs
Step 3: Set column spacing to “1”
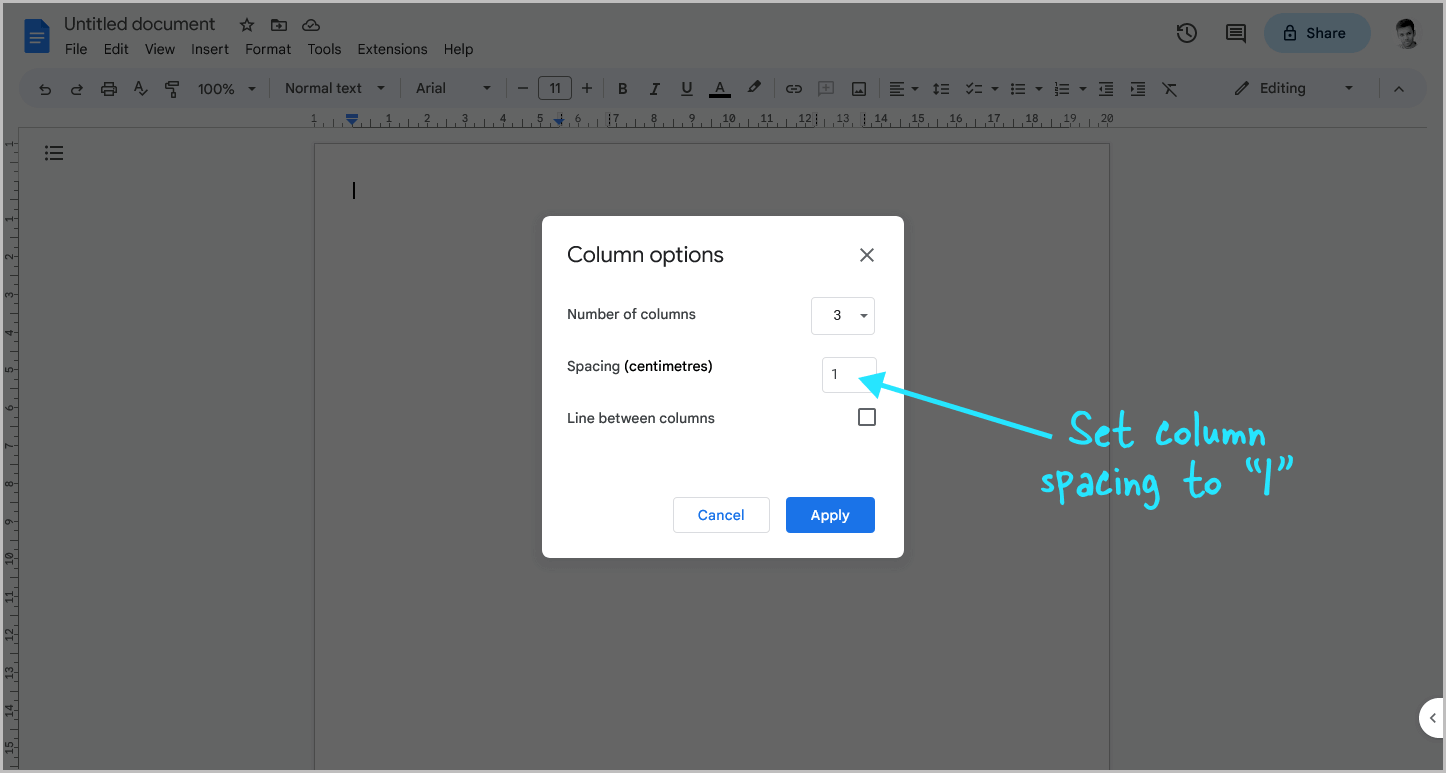
Next, navigate to Format > Columns > More options.
Within the Column options, adjust the column spacing to “1 cm”.
This setting ensures a narrow and balanced spacing between the columns.
While the default value is an option, it may result in a noticeable gap between the columns, which might appear peculiar.
It is advisable to select a spacing size between 0.5 cm to 1 cm that appears visually pleasing and avoids any odd visual effects.
Step 4: Choose the “Newsreader” font
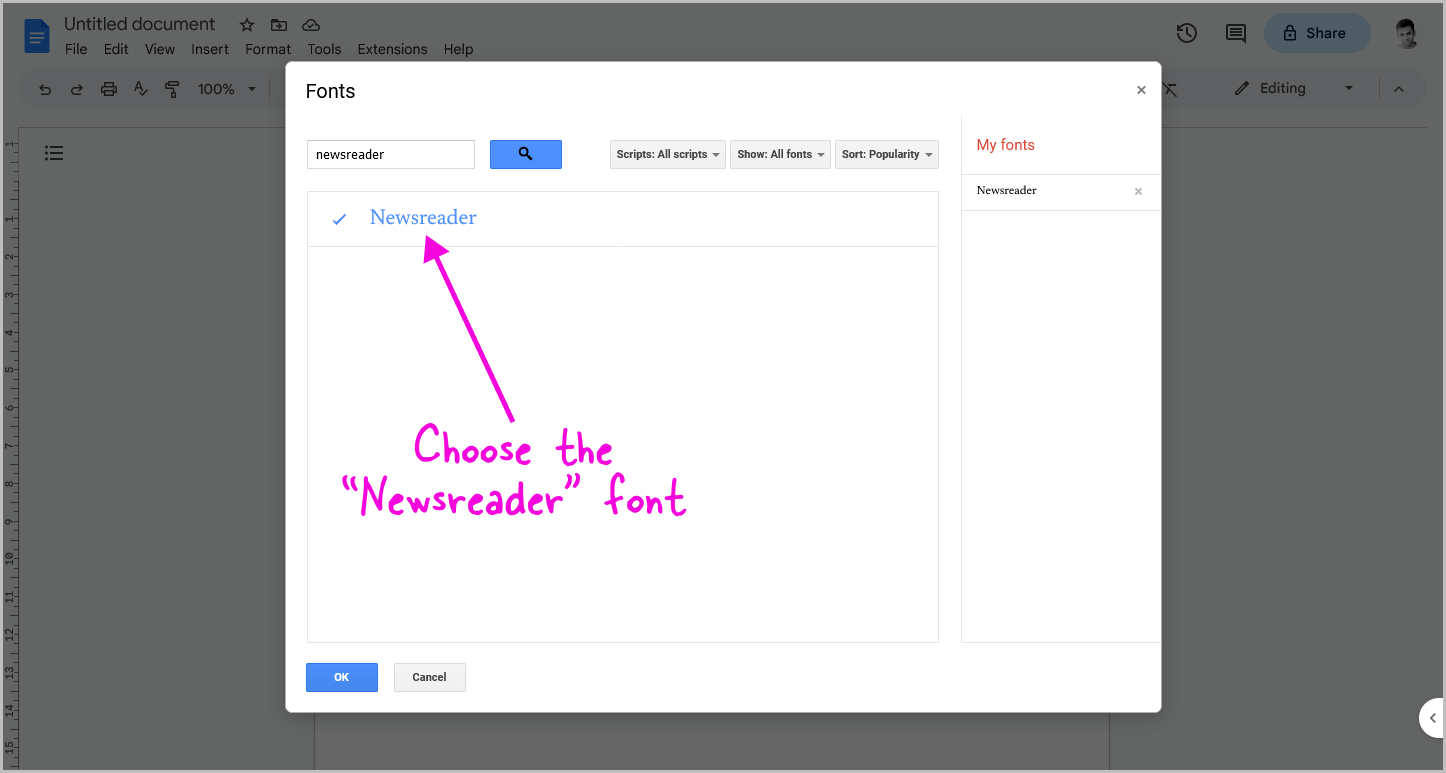
With the page setup completed, it’s time to choose the ideal font for your newspaper.
By default, the font is set to “Arial,” but to achieve a genuine newspaper appearance, opt for the “Newsreader” font.
To do this, simply click on the “Arial” font in the toolbar, select “More fonts,” search for “Newsreader,” click on it, and then press the “OK” button.
Additionally, there are several other fonts worth considering for your newspaper project.
For a comprehensive list of the best newspaper fonts available on Google Docs, refer to this informative article: Newspaper Fonts on Google Docs
Step 5: Set the font size to “11”
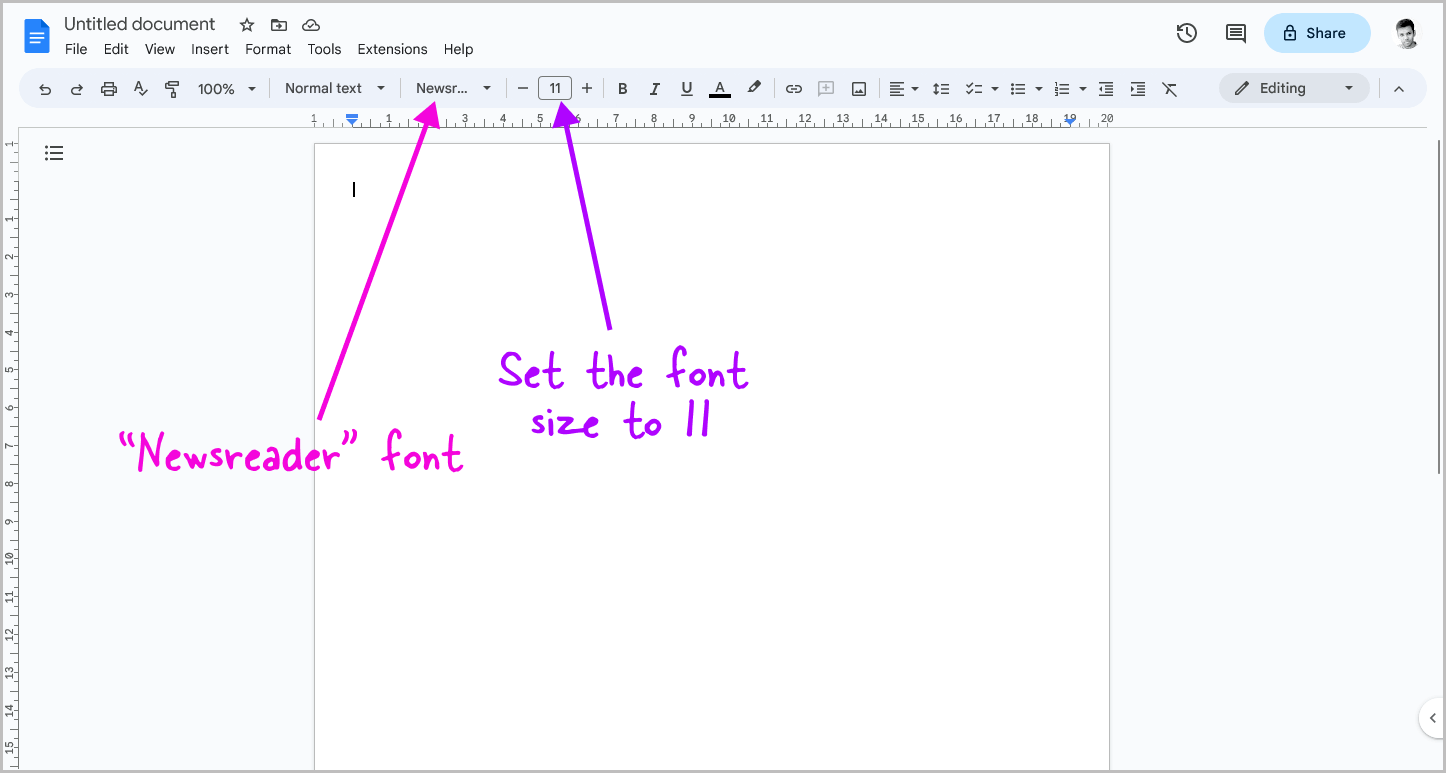
The default font size is conveniently set to “11”, which is an ideal choice.
However, if you prefer a larger font size, you can easily adjust it by clicking on the “+” icon next to the font size box until you achieve the desired size.
Nevertheless, I would suggest sticking to the widely used font size of “11” for optimal readability and consistency.
Step 6: Start typing the body content
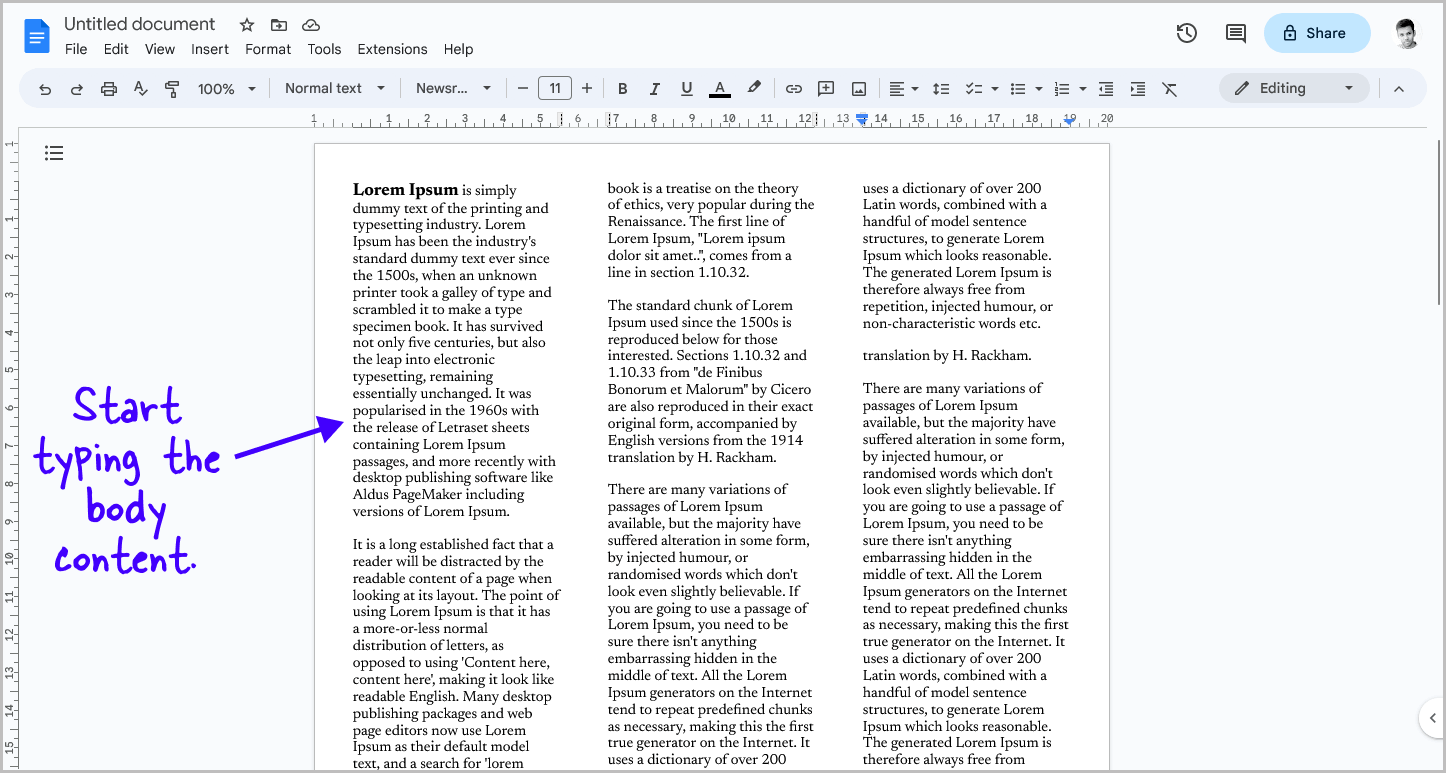
You can now begin typing the content for your newspaper.
It is advisable to hold off on adding the images for now, as we need to apply specific settings to ensure they fit seamlessly.
Once you have finished entering the content, you can proceed to the next step.
Step 7: Select the content and justify it
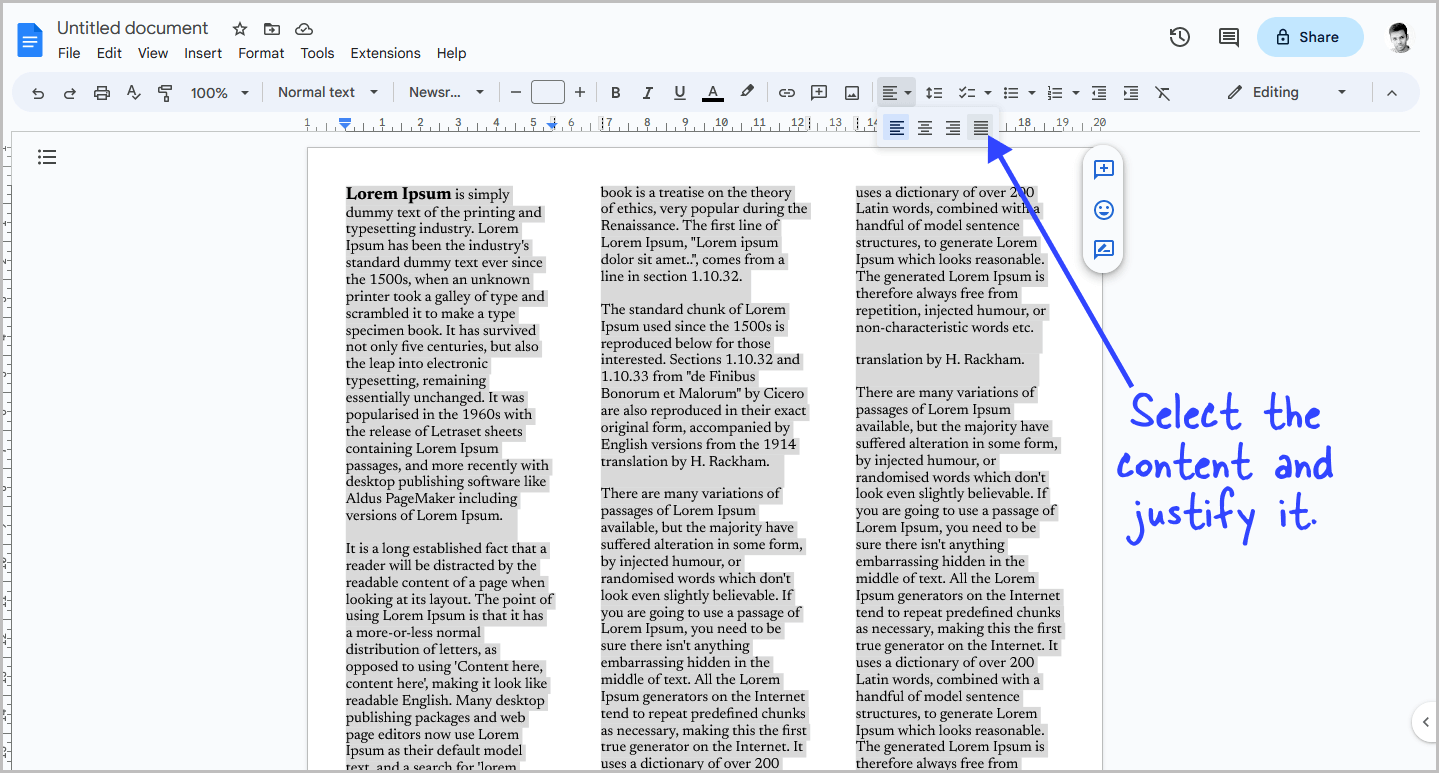
Once you have completed entering the content, press Ctrl+A to select all the text, and then press Ctrl+Shift+J to justify the content.
Alternatively, you can click on the “Align” tool in the toolbar and choose “Justify” from the menu.
By doing so, your content will take on the authentic appearance of a newspaper.
However, we are not finished yet; there are a few more adjustments needed to ensure the document truly resembles a newspaper.
Step 8: Add images (optional)
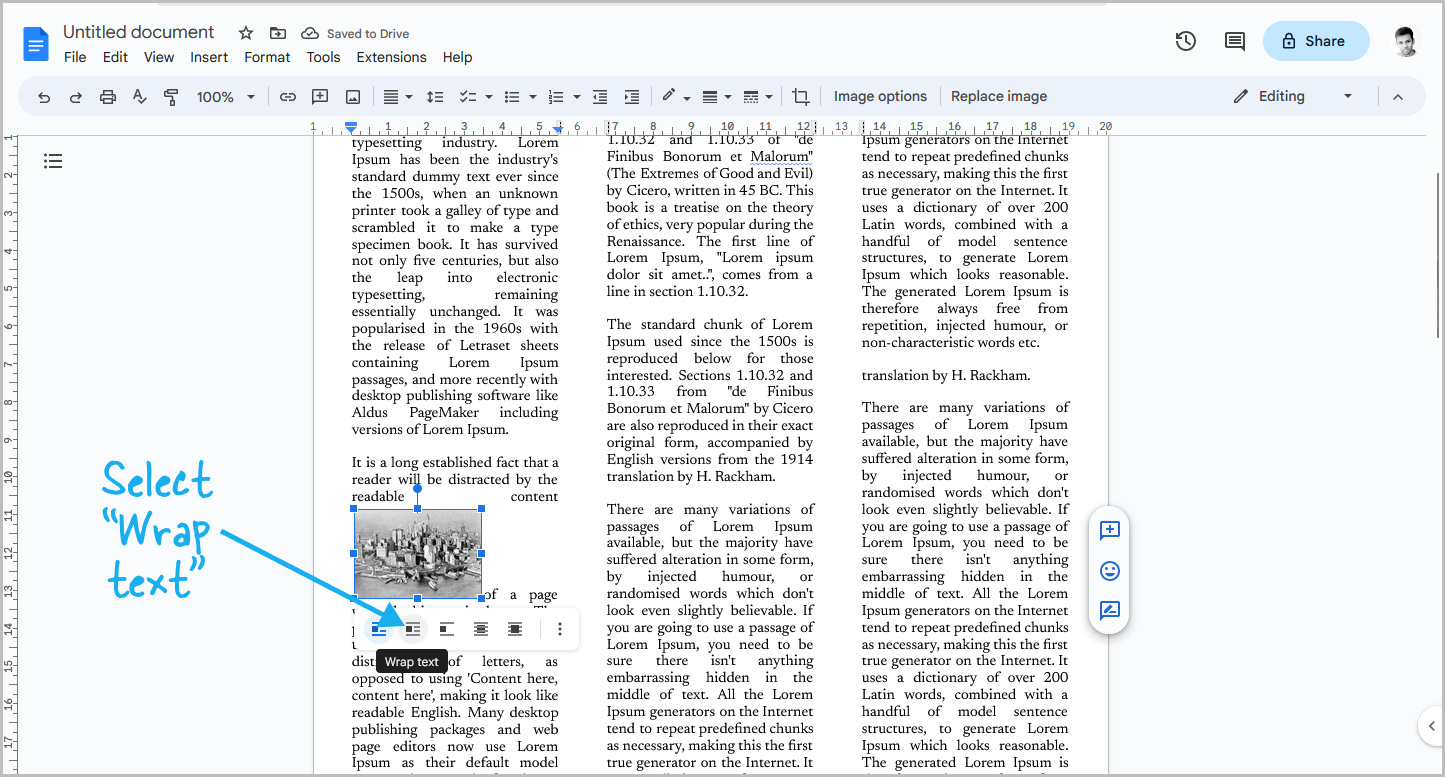
To insert an image, click on the desired location where you want to place it, ensuring that the cursor is positioned there.
Next, drag and drop the image into the selected spot, and it will automatically adjust within the column.
Afterward, click on the image and choose “Wrap text” from the image options panel.
Additionally, you have the option to adjust the “Image margin” from the image options panel.
Step 9: Set the header margin to “1”
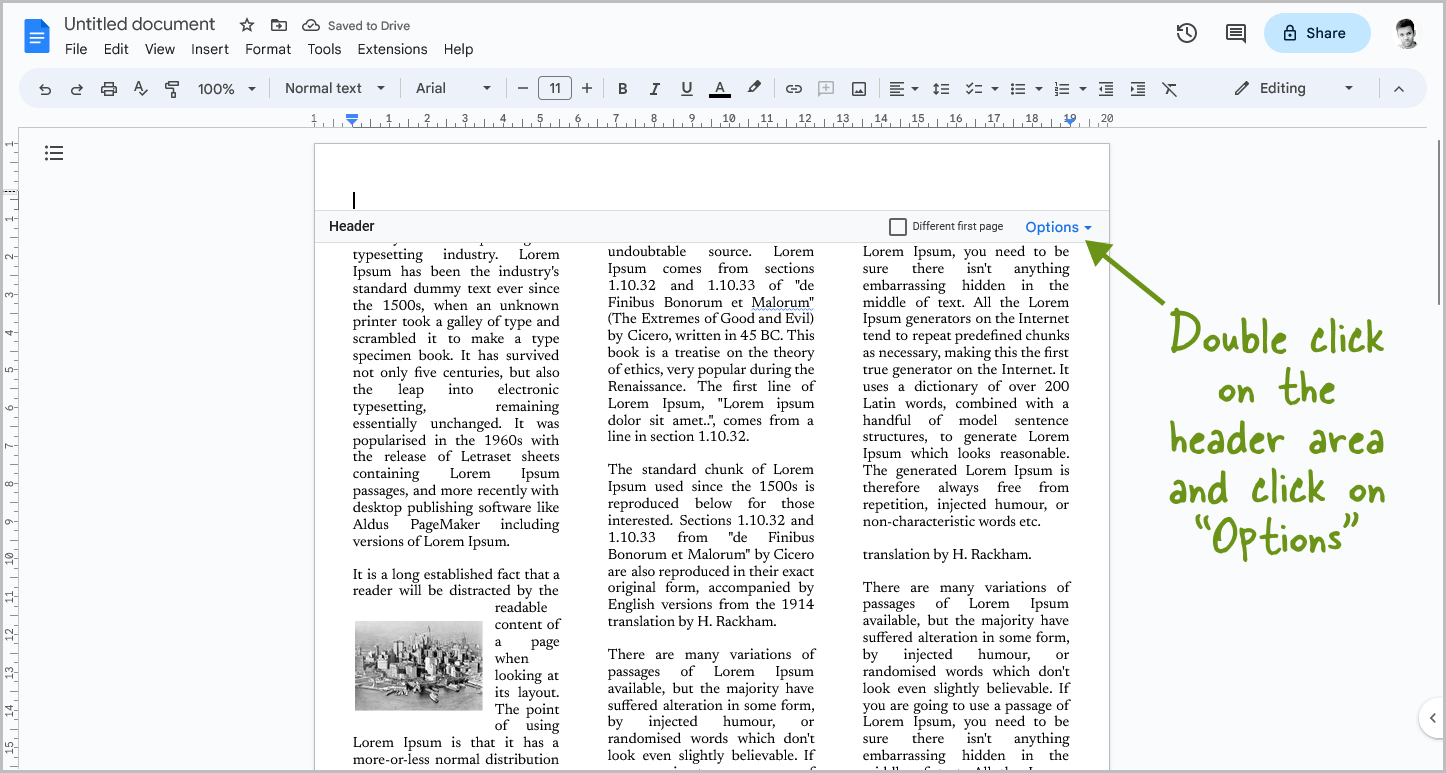
Upon double-clicking on the header section, you will notice the “Options” menu positioned at the bottom right corner of the header.
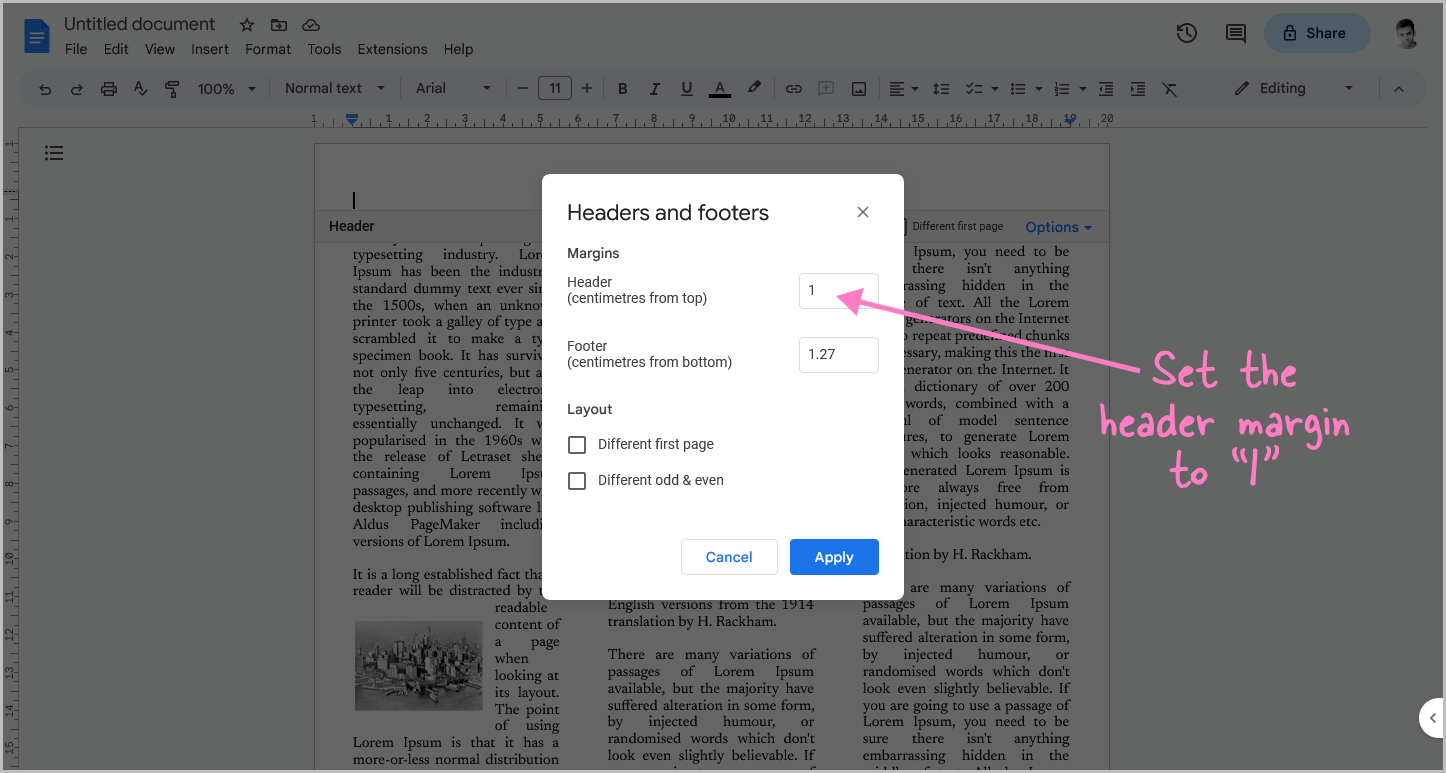
Click on it, and then choose “Header format” from the menu.
From there, adjust the “Header” margin to 1 cm and click the “Apply” button to save the changes.
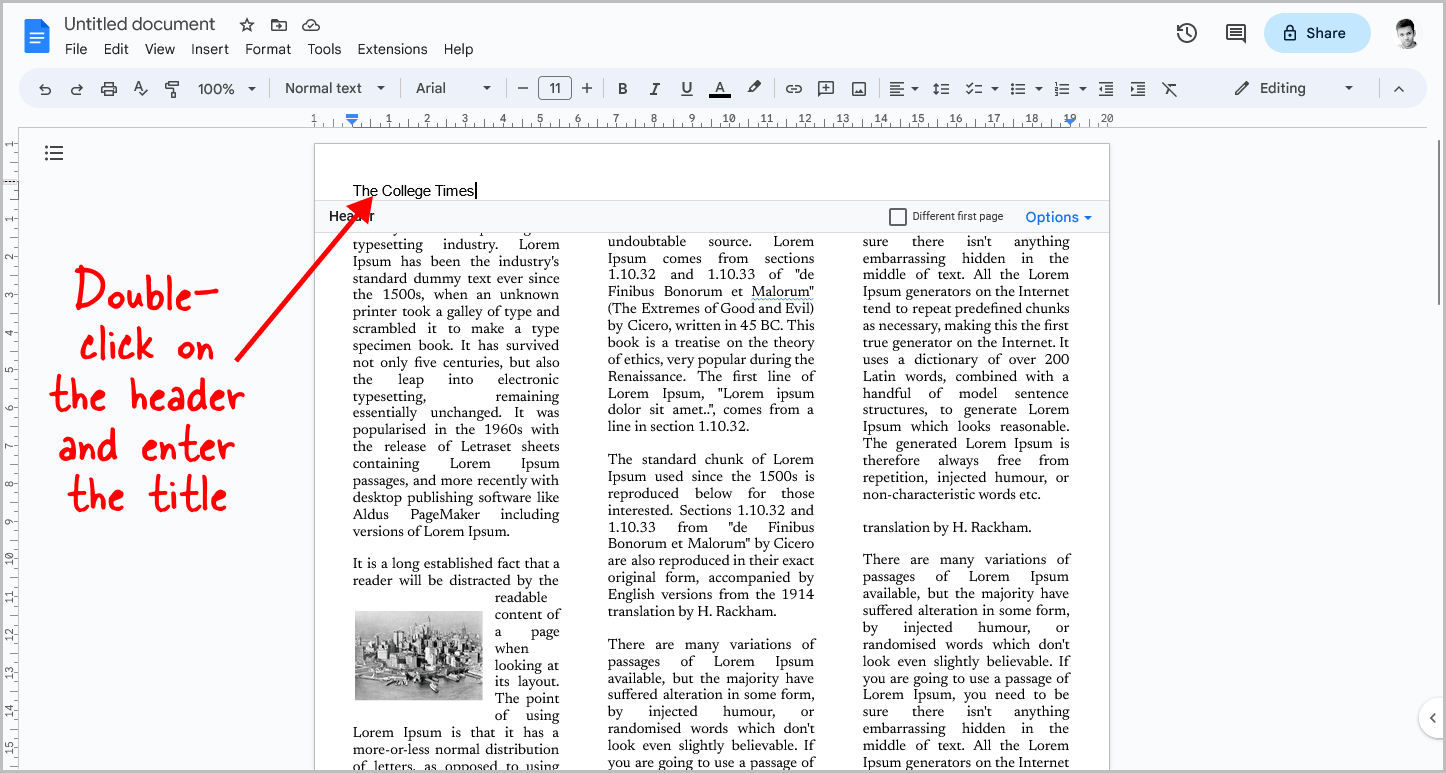
Step 10: Double-click on the header and enter the title
We’re nearing the finish line!
Now, let’s add the name of the newspaper and the date, mirroring the format of traditional newspapers.
To get started, position your cursor at the top of the page and double-click to access the header section.
Within the header area, click and enter the name of the newspaper. For instance, let’s say “The College Times.”
Step 11: Set the header font size to “60”, make it bold, and underline it
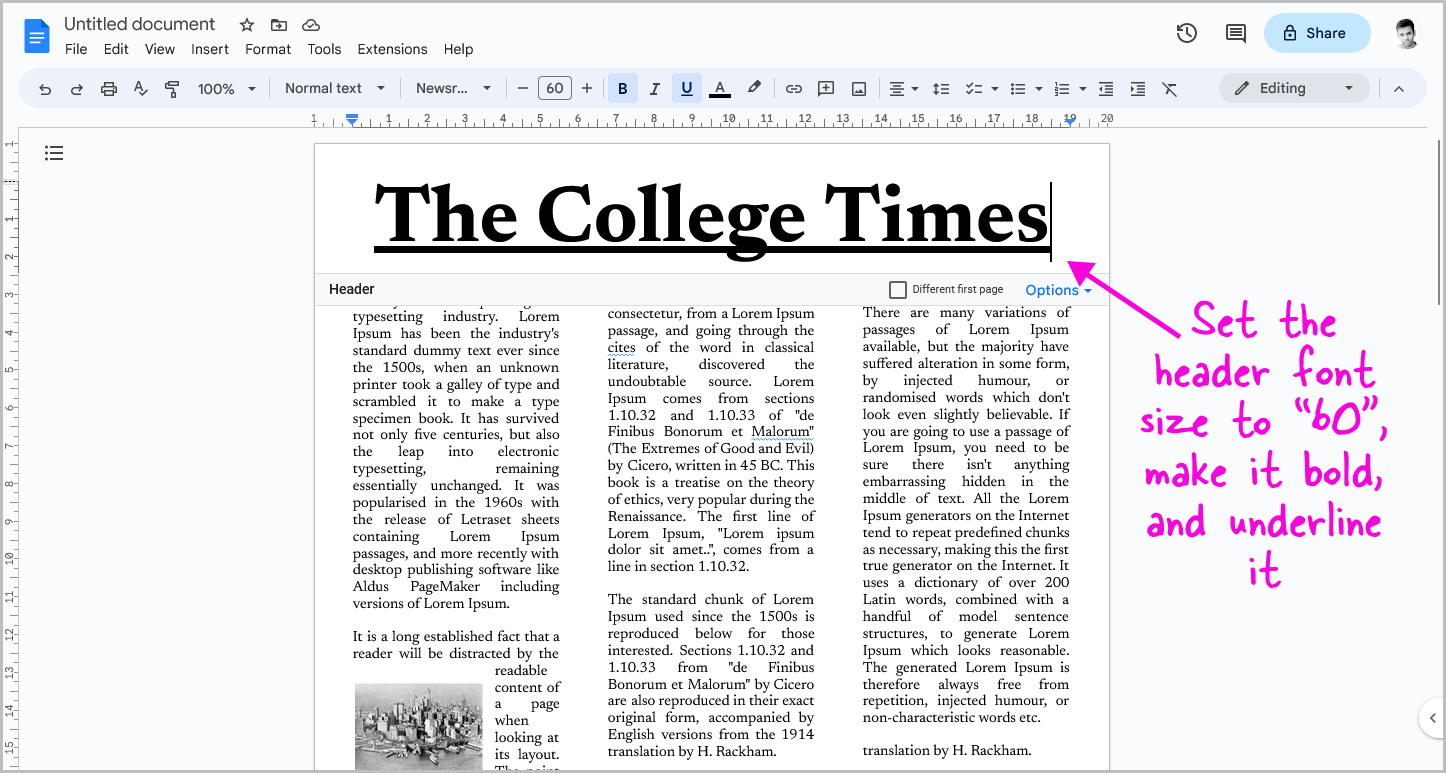
Next, highlight the entered newspaper name and adjust the font size to “60”.
To make the text bold, press Ctrl+B, and to underline it, press Ctrl+U.
Confirm that the font style remains set to “Newsreader”.
Additionally, ensure that the name is centered on the page for a balanced and visually appealing layout.
Step 12: Press “Enter” and type the date and adjust the font size
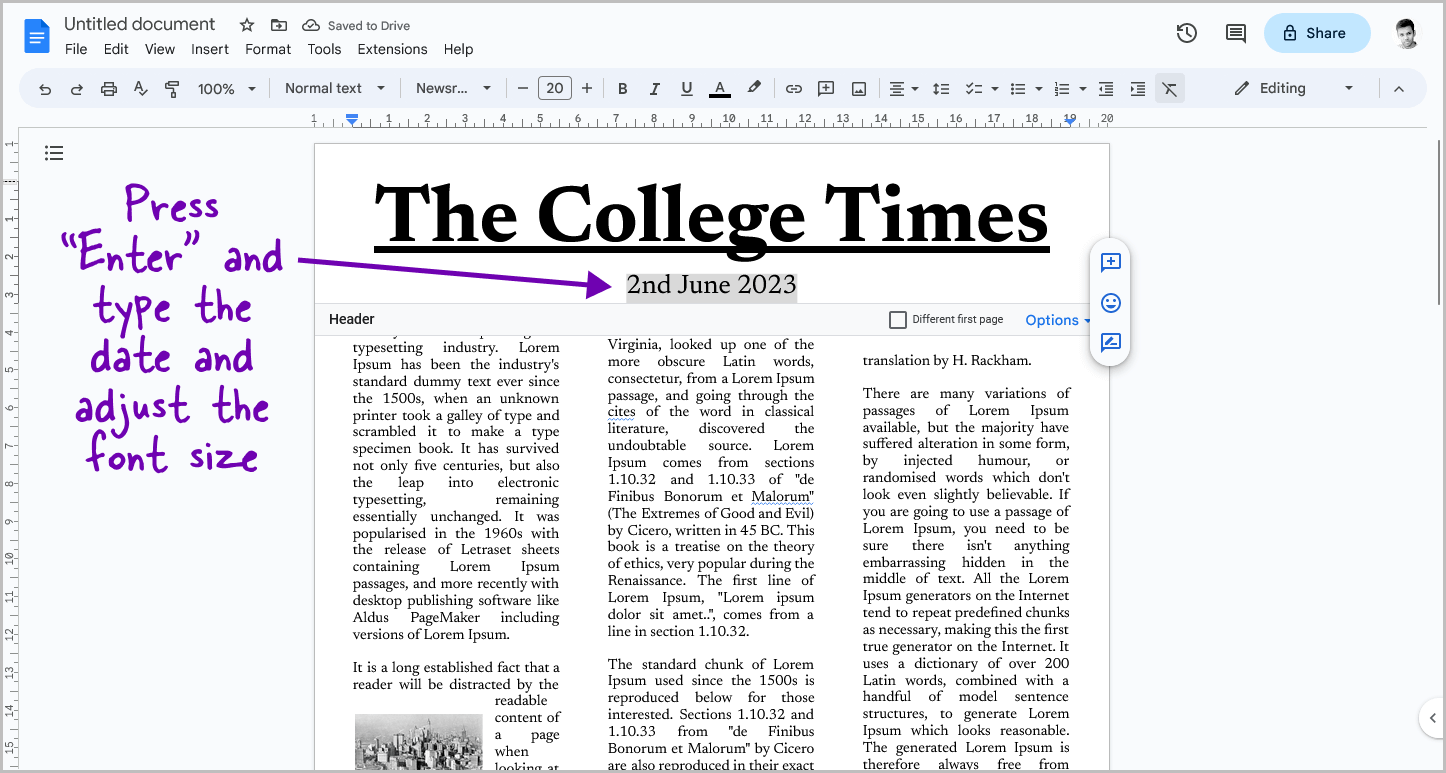
After entering the title, press the Enter key on your keyboard to move to the next line, and then input the date, such as “2nd June 2023”.
Next, select the date and modify the font size to “20” for better visibility.
Step 13: Go to Insert > Horizontal line
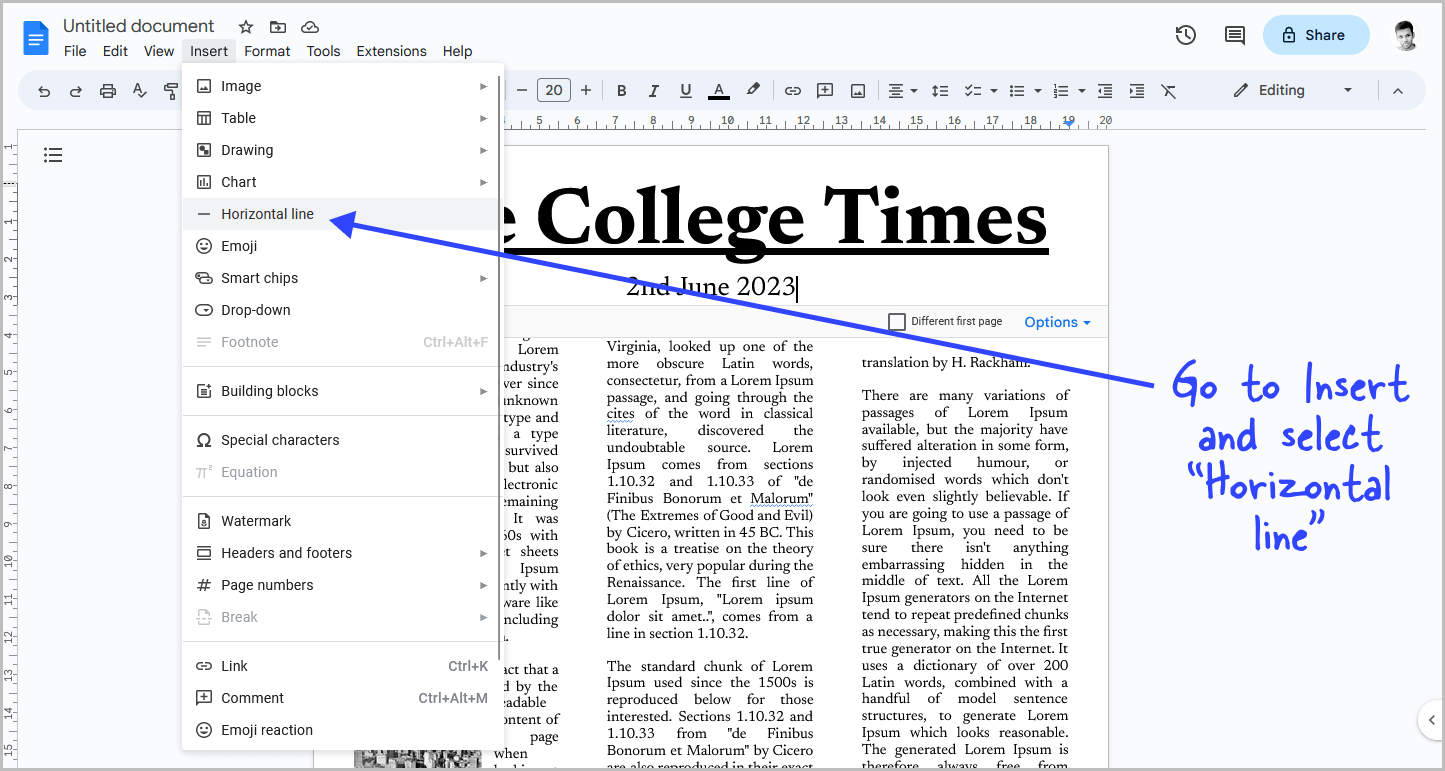
With the cursor positioned next to the date, navigate to the “Insert” option in the top menu, and select “Horizontal line” from the drop-down menu.
And there you have it!
With this last step, your document will resemble a newspaper.
Conclusion
In conclusion, creating a newspaper on Google Docs is an achievable task that allows you to replicate the look and feel of a genuine newspaper.
By following these simple steps, you can easily bring your newspaper project to life:
- Choose A4 paper size and set 1 cm margins.
- Go to Format > Columns > Choose 3 columns.
- Set column spacing to 1 cm.
- Choose the “Newsreader” font.
- Set the font size to 11.
- Start typing the body content.
- Select the content and justify it.
- Add images (optional) and adjust their settings.
- Set the header margin to 1 cm.
- Double-click on the header and enter the title.
- Set the header font size to 60, make it bold, and underline it.
- Press Enter, type the date, and adjust the font size.
- Go to Insert > Horizontal line.

