Want to learn how to add categories in Google Sheets?
Categories are a useful way to organize your data.
For example, if you have a Google Sheets spreadsheet to manage your daily expenses, you can create different categories (such as Food, Travel, Entertainment) to track where your money is being spent.
By adding a list of categories to the sheet, you can easily select the appropriate option whenever you enter an expense (e.g. Food).
Whether you’re tracking expenses, managing projects, or simply keeping track of your to-do list, categories can help you stay organized.
In this article, you will learn how to add categories in Google Sheets, step-by-step.
Also read: (opens in new tab)
Character Count in Google Sheets [With and Without Spaces]
Google Sheets Date Picker
Group Sheets in Google Sheets
Can You Highlight Text in Google Sheets
How to Add Categories in Google Sheets
To add categories in Google Sheets, first create a new column for categories. Then, select the cells in that column and go to Data > Data validation. Add category names in the “Option” fields, customize colors and styles if needed, and save the settings by clicking “Done.”
Step 1: Create a new column for your categories
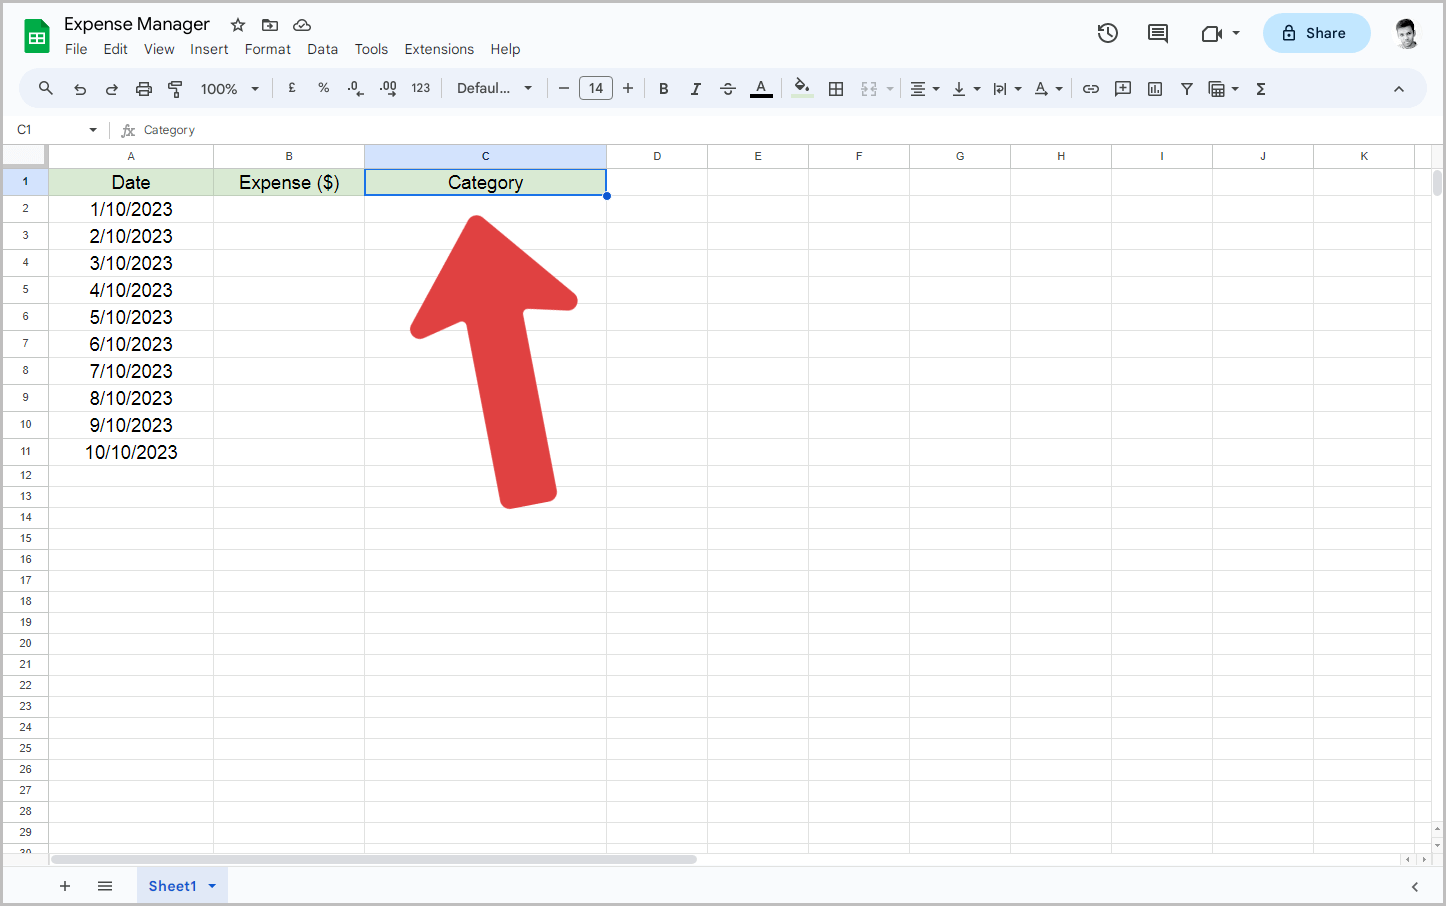
The first step is to select a column in the sheet where you want to input the categories drop-down menu.
For this tutorial, I will be creating a simple expense manager spreadsheet on Google Sheets.
To start, I created the first column to record the exact date of the expense, and named it “Date”.
In the second column, I entered the amount in dollars and named it “Expense ($)”.
For the third column, I designated it for the categories and named it “Category”.
Similarly, you can choose a column for the category menu and give it an appropriate name.
Step 2: Select the cells within the category column
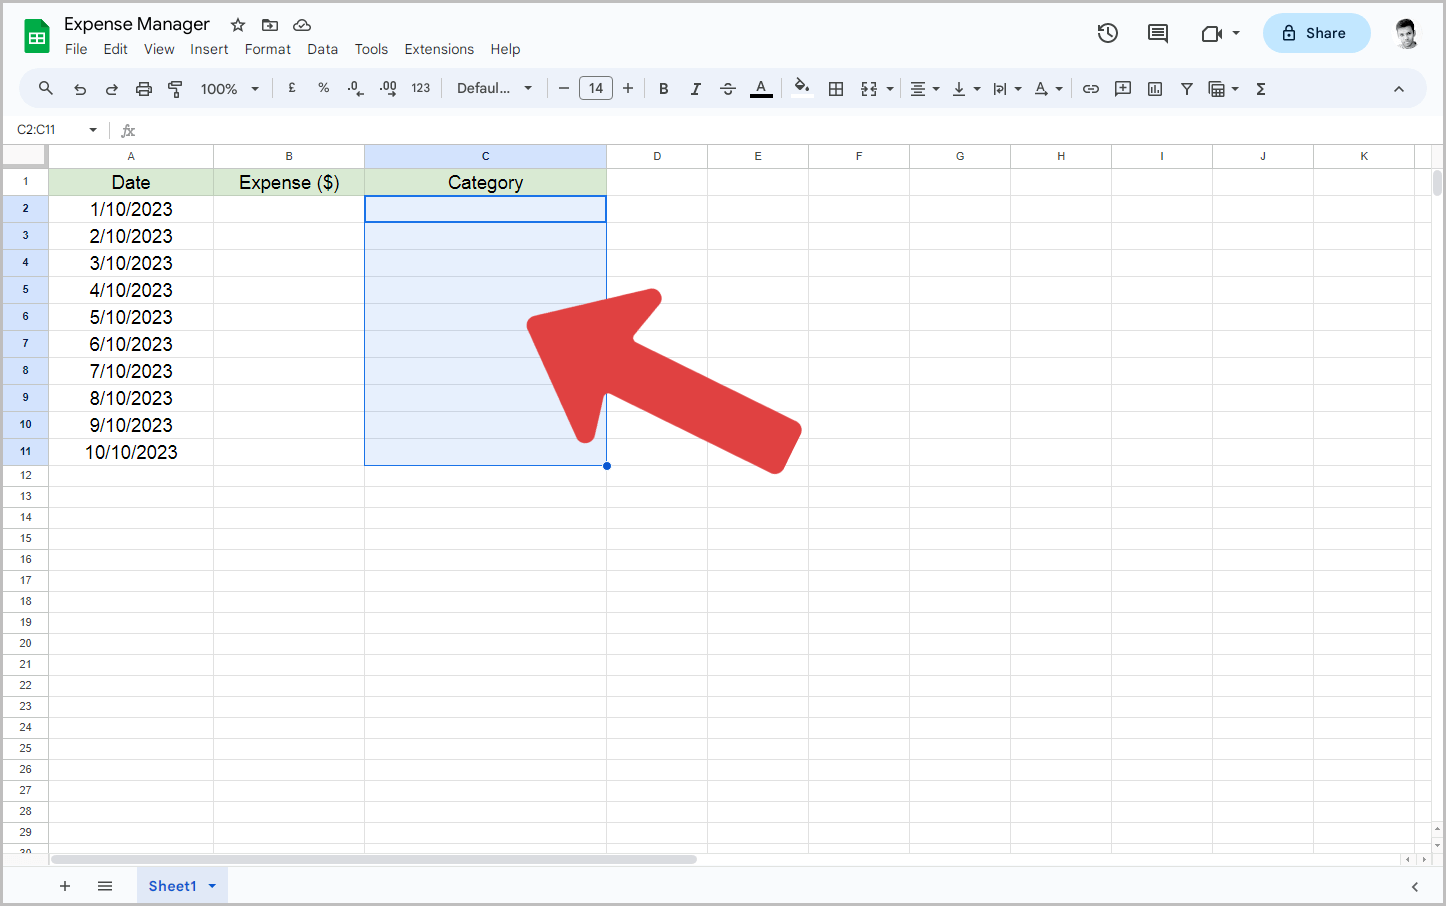
After creating the category column, select the cells in the column where you want the category drop-down.
Be careful not to select the cell with the column name.
Now, proceed to the next step.
Step 3: Navigate to Data > Data validation
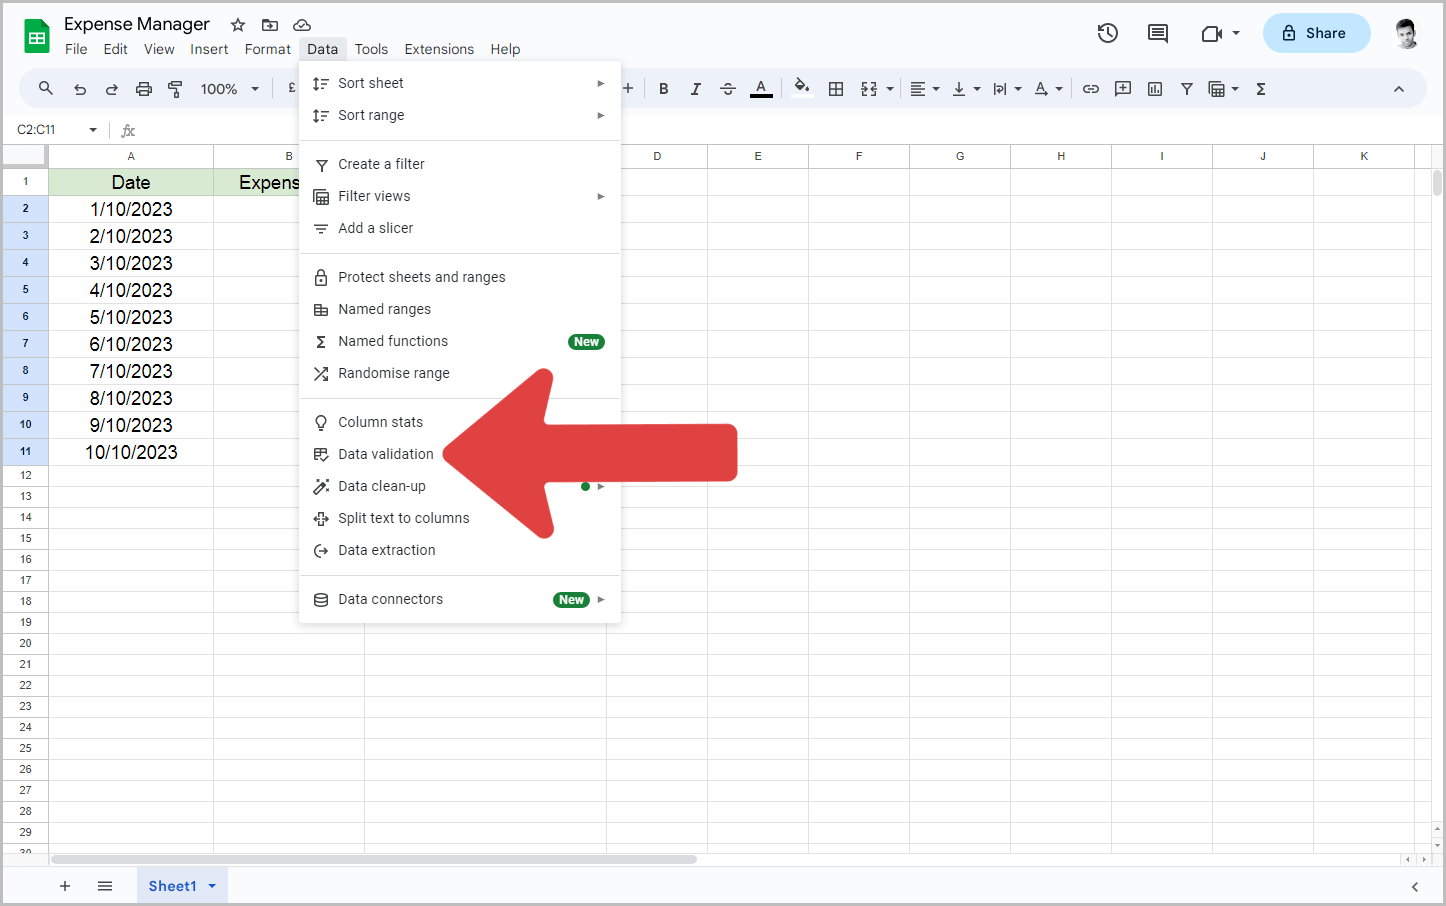
After selecting the cells, navigate to the top menu and click on the “Data” option.
From the drop-down menu, choose “Data validation”.
This action will open the “Data validation rules” panel, which is located on the right side of the page.
Step 4: Click on “+ Add rule”
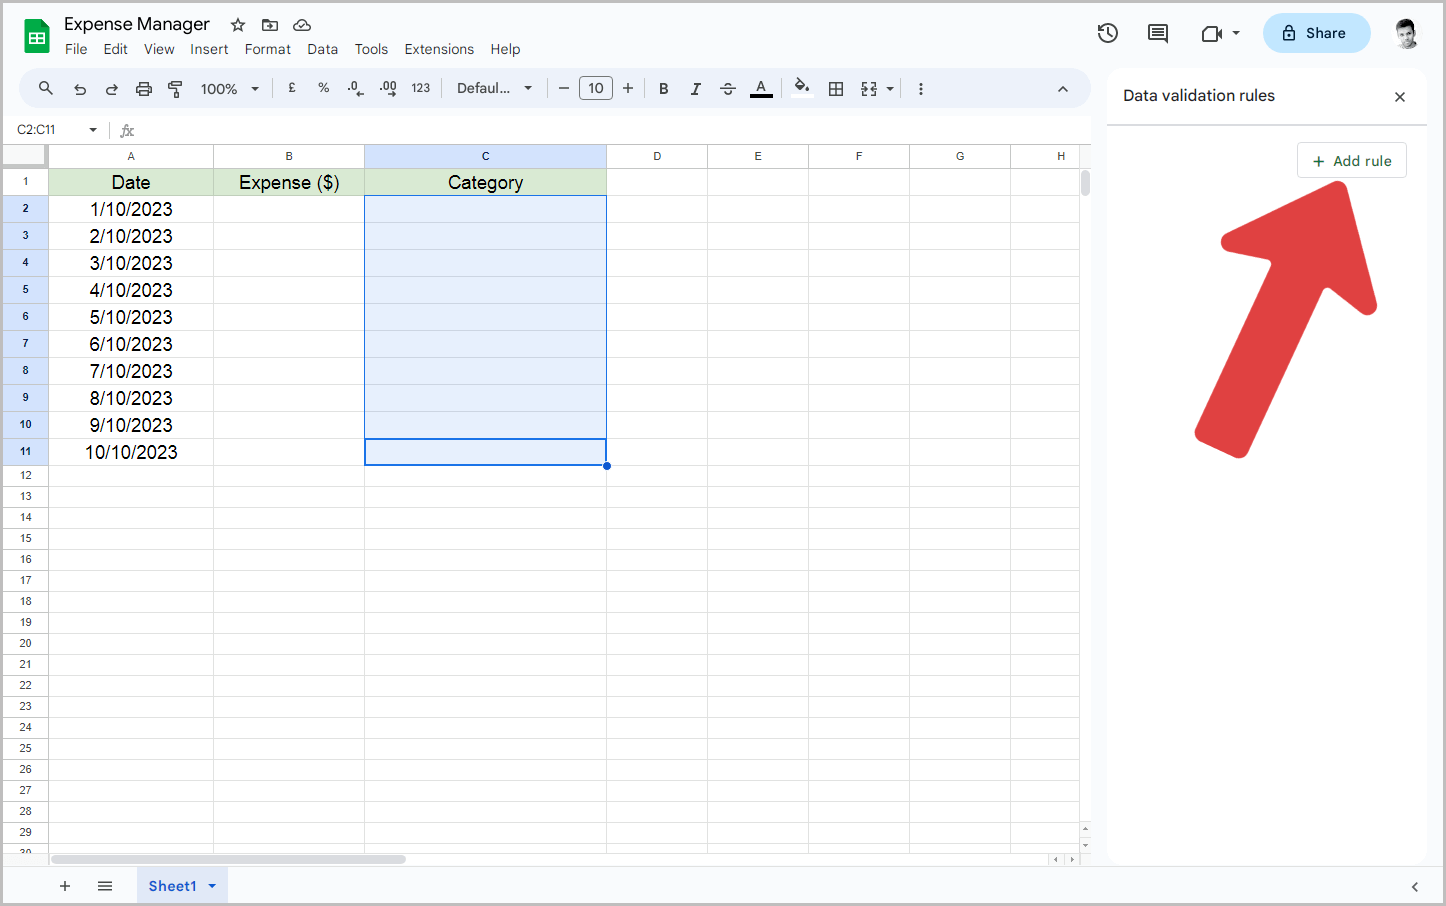
In the “Data validation rules” panel, you will find the “+ Add rule” button.
Click on it and proceed to the next step.
Step 5: In the ”Criteria” menu, select Drop-down”
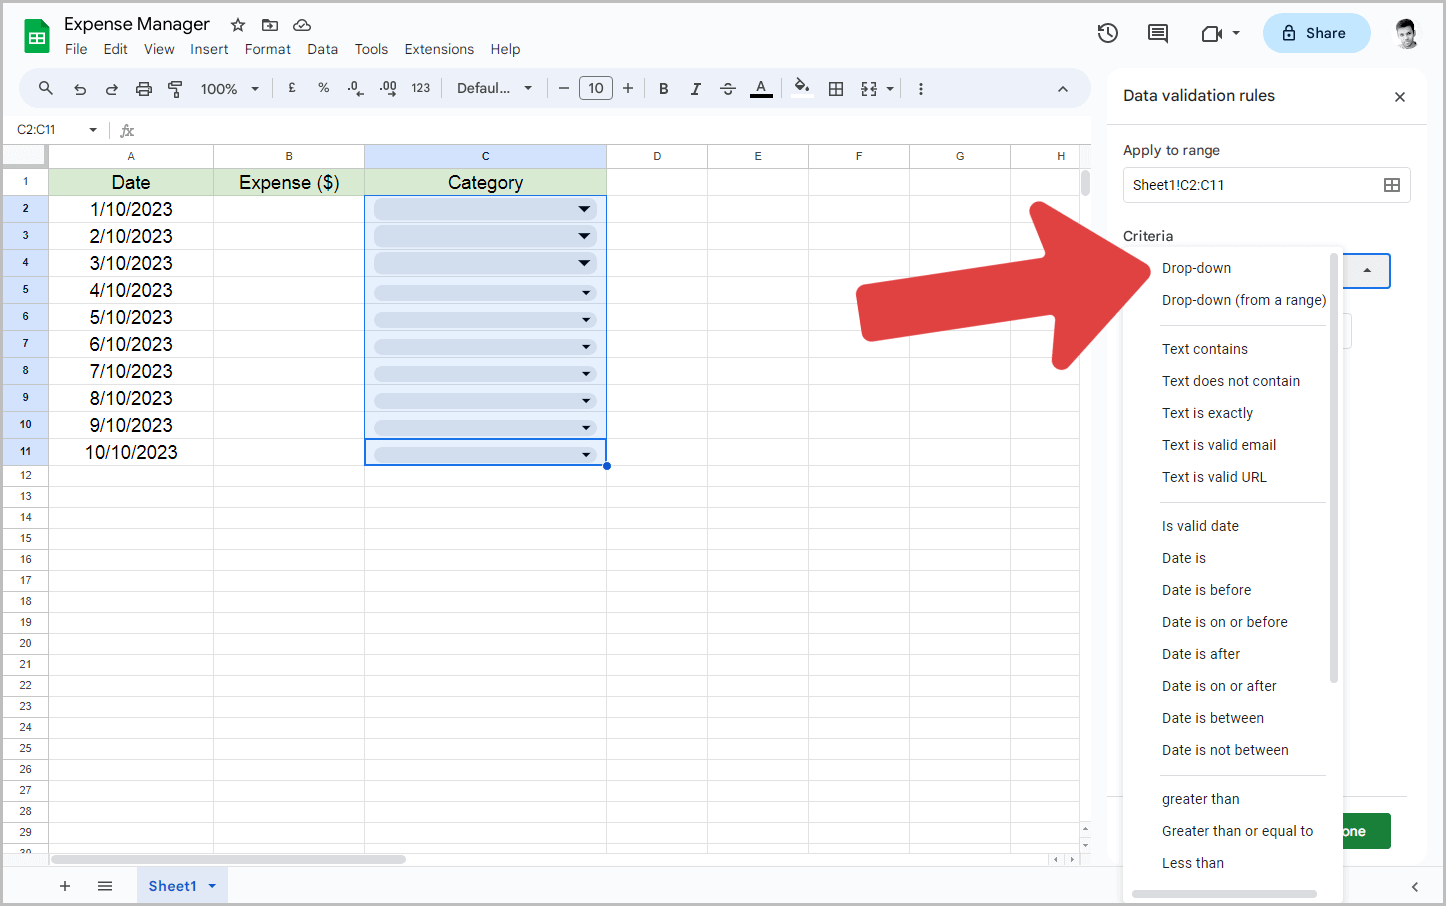
In the panel, the first option is “Apply to range”.
This is where the category drop-down will be added.
Verify that the range is correct and correct it if necessary.
The second option is “Criteria”. By default, the “Drop-down” criteria is selected.
If it is not selected, click on the menu and choose the “Drop-down” option.
Step 6: Enter your first category in the “Option 1” field
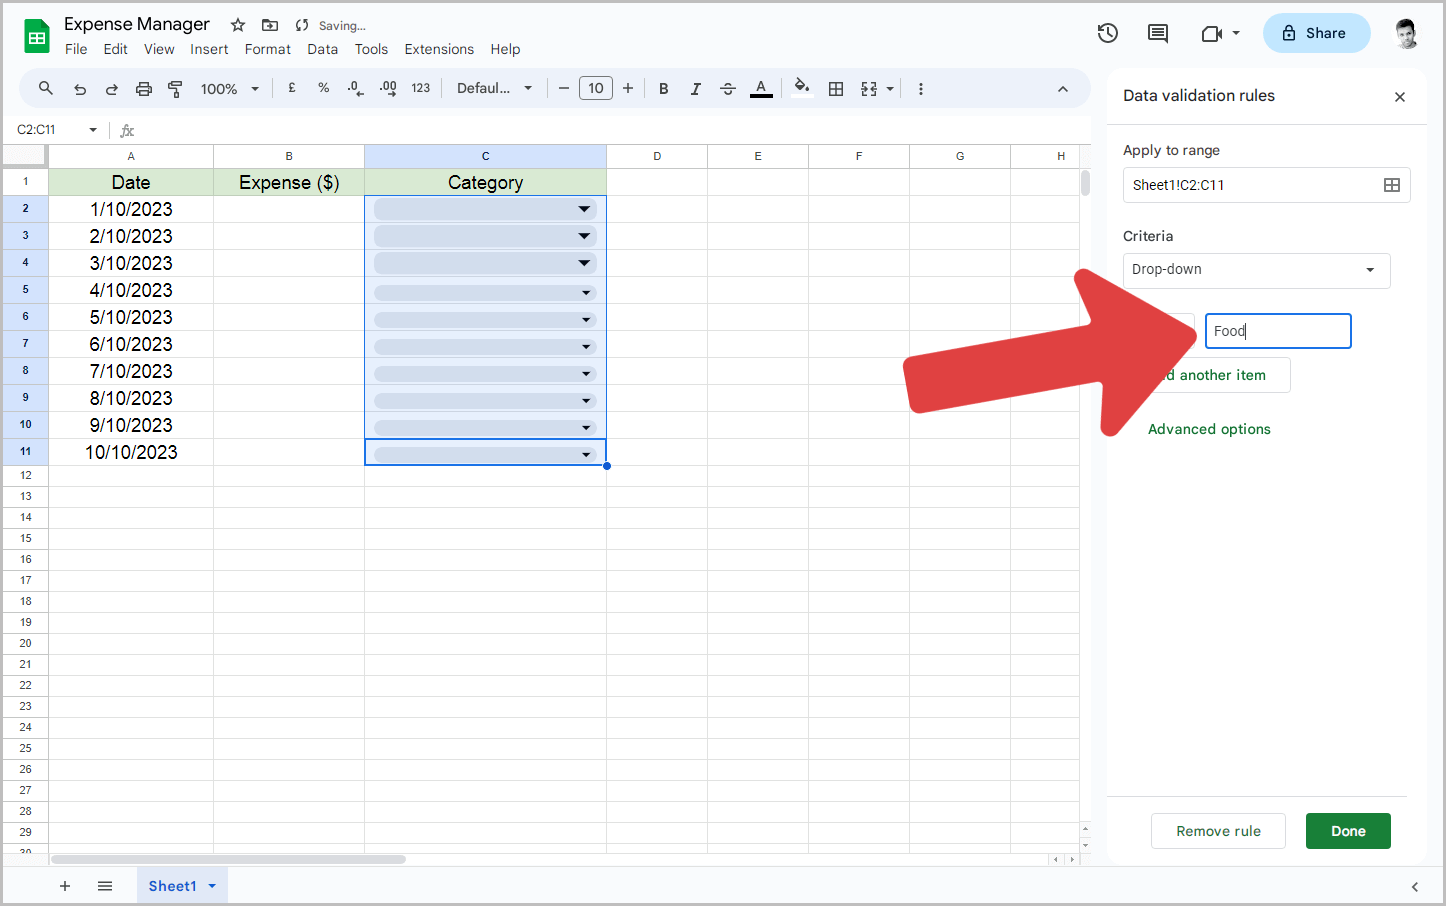
Now, it’s time to add the first category in the “Option 1” field.
Click inside the box and enter the name of the first category.
In this example, the category name is “Food”.
Once you’ve entered the name, proceed to the next step.
Step 7: Click “Add another item” to add more categories
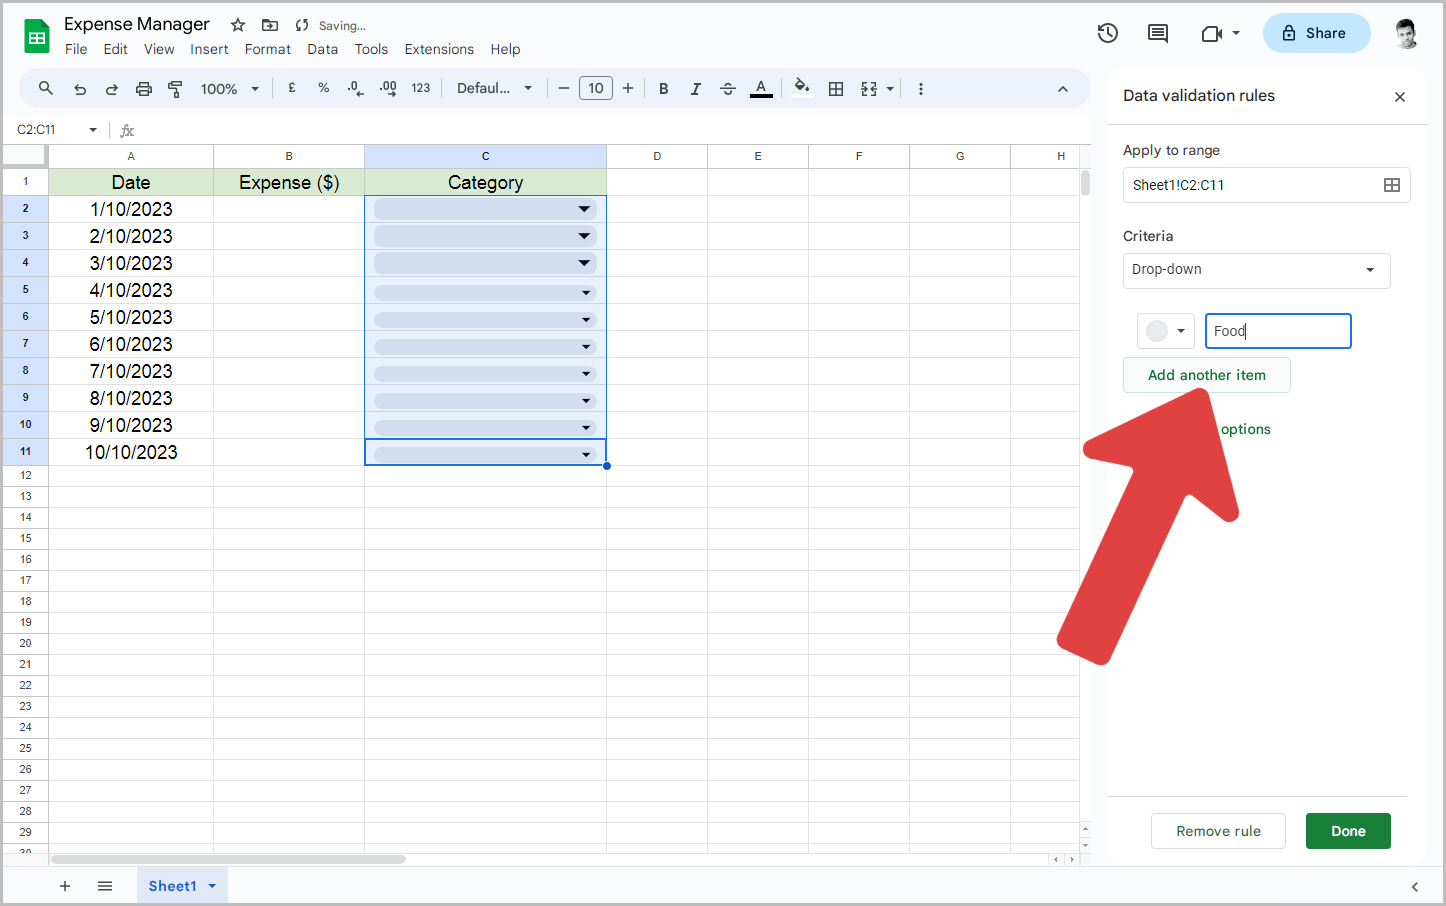
To add more categories, click on the “Add another item” button.
In my case, I had three categories: Food, Car, and Entertainment.
So, I clicked the “Add another item” button twice to create two new options and then named the categories.
If you don’t know all the categories yet, simply enter the names of the categories you do know.
You can edit the category list later.
Step 8: Customize the option colors if needed
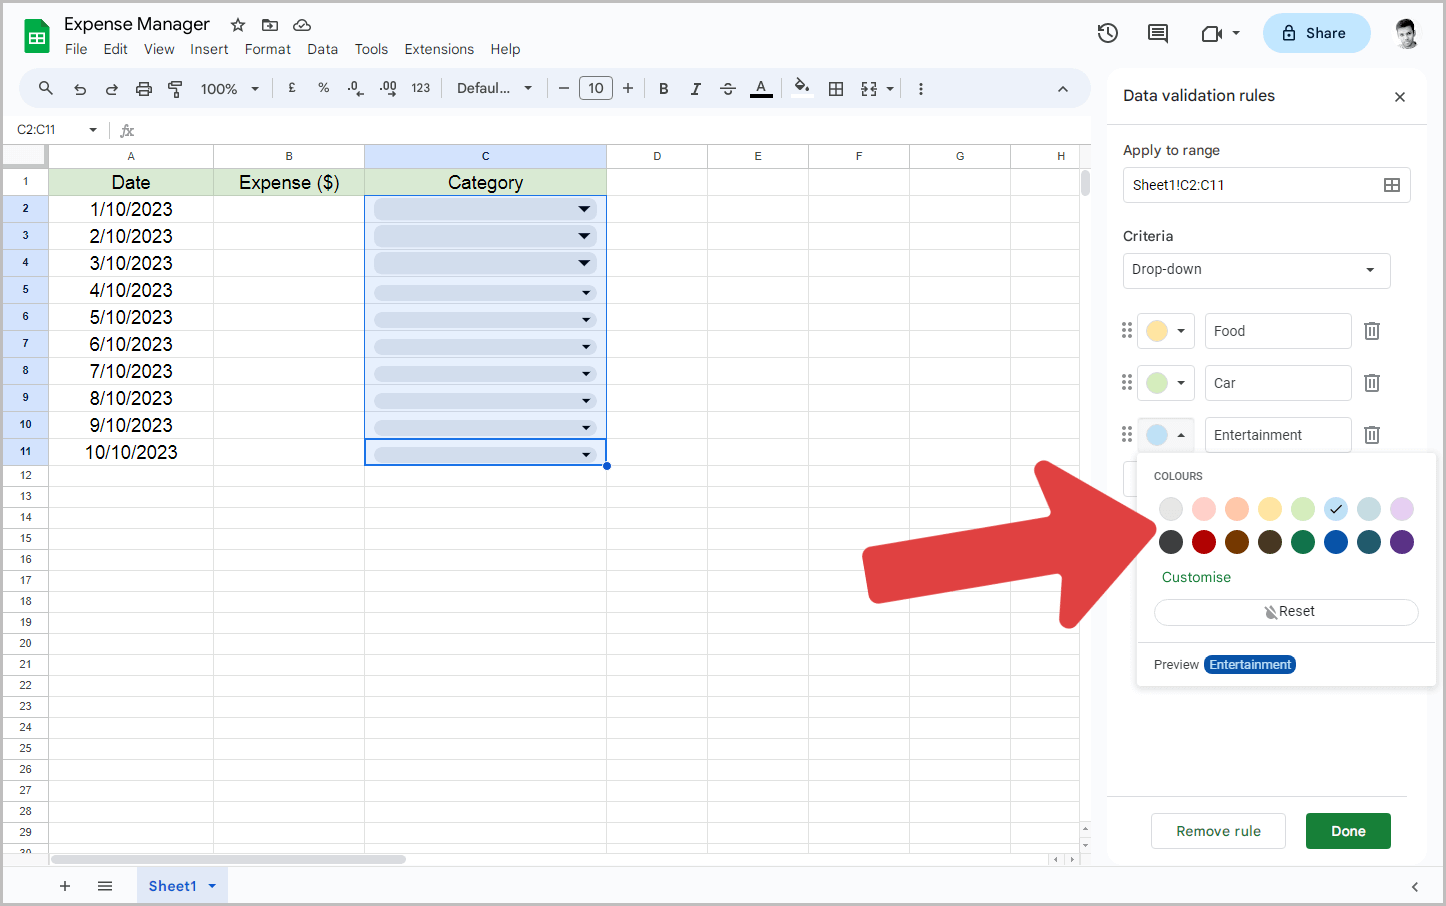
This step is optional, and you can skip it if desired.
I wanted each category to have a different color to make the data easier for me to read.
Therefore, I decided to change the color of each option.
To do this, locate the circle on the left side of the category name, which is initially displayed in the default white color.
Click on this circle and choose a color of your preference.
Repeat this process for the other categories.
Additionally, you have the option to change the category style.
To do so, click on “Advanced options” and then select the desired style from the “Display style” menu.
Step 9: Click “Done” to save your settings
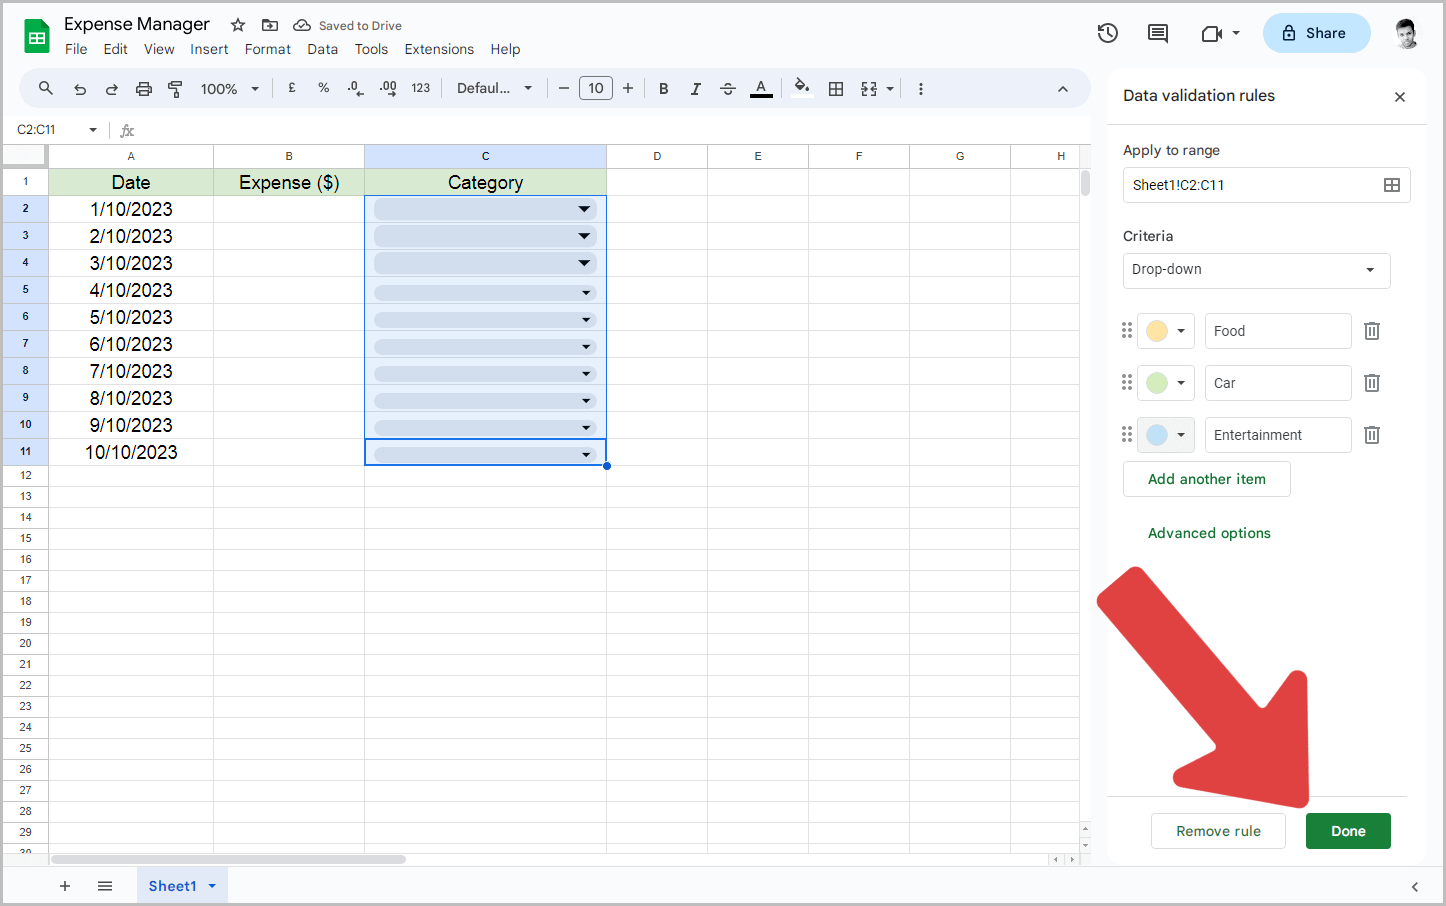
After editing the category menu, click on the “Done” button to save your changes.
You can also close the “Data validation rules” panel.
Congratulations! You have successfully added categories in Google Sheets.
Step 10: Test the category feature in the newly created column
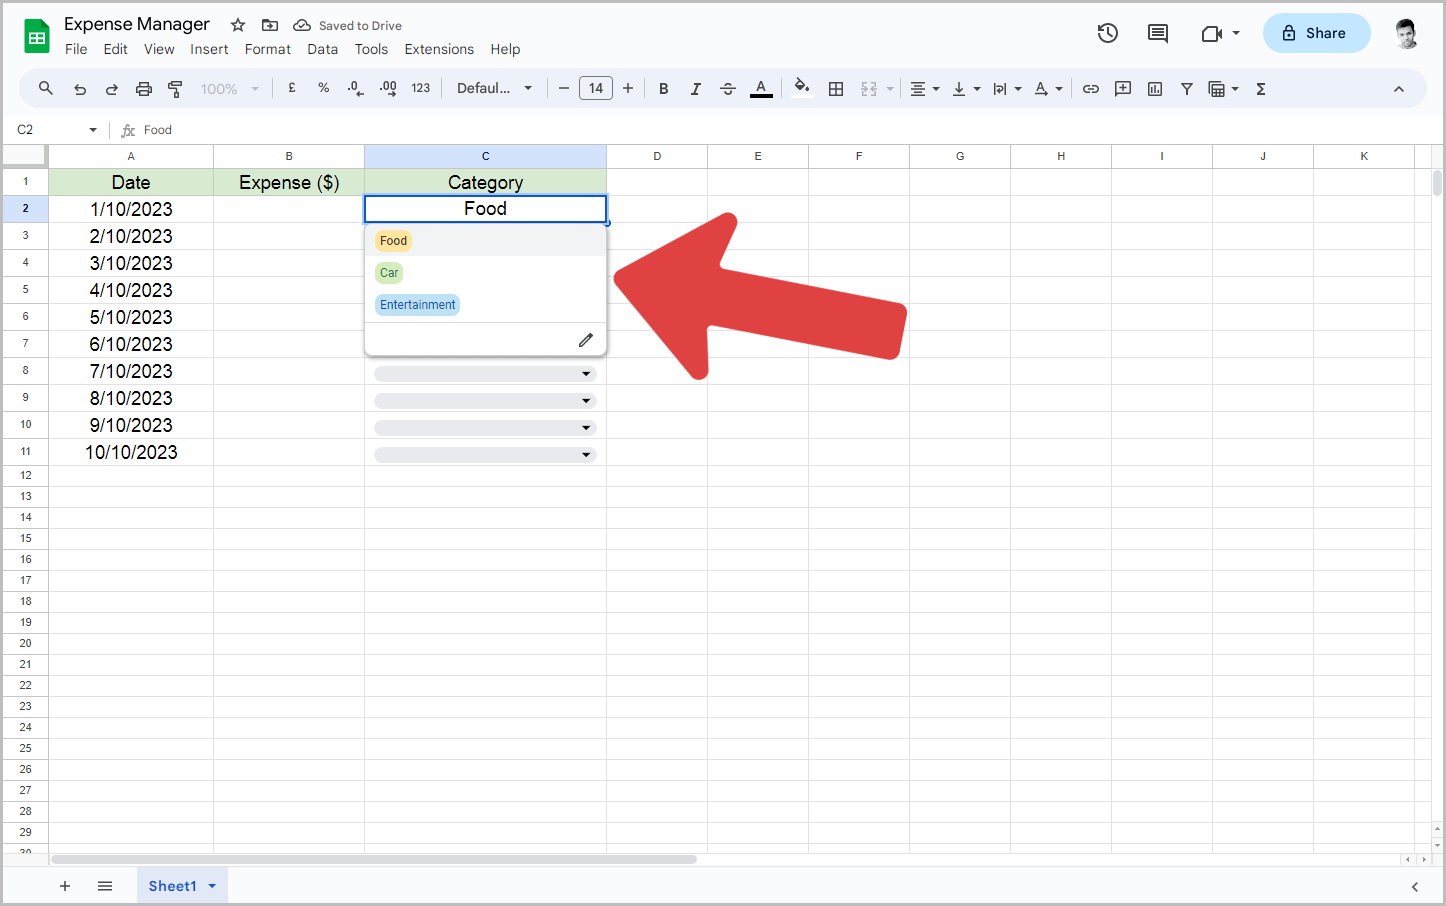
Now that the category feature has been created, it’s time to test it.
As I have created an expense manager, I started by entering the date in the first column, followed by the amount in the second column.
Then, I clicked on the first cell in the category column and selected the “Food” category from the drop-down menu.
Everything was working perfectly fine!
If you want to add more categories or edit the color, simply select the cells, go to Data > Data validation, choose the created rule, and make the necessary changes to the categories.
FAQs
Can you add categories to Google Sheets?
Yes, you can add categories to Google Sheets by creating a new column for categories and using data validation to create a drop-down list of category options.
How do I add categories to a drop down list in Google Sheets?
To add categories to a drop-down list in Google Sheets, follow these steps:
- Create a new column for categories.
- Select the cells in the category column.
- Navigate to Data > Data validation.
- Click on “+ Add rule” and select “Drop-down” as the criteria.
- Enter category names in the “Option” fields.
- Customize colors and styles if desired.
- Click “Done” to save the settings.
How do I create a category in a spreadsheet?
To create a category in a spreadsheet, follow these steps:
- Create a new column for categories.
- Select the cells in the category column.
- Navigate to Data > Data validation.
- Click on “+ Add rule” and select “Drop-down” as the criteria.
- Enter the category name in the “Option” field.
- Customize colors and styles if needed.
- Click “Done” to save the settings.
How to create drop-down list in Google Sheets with color?
To create a drop-down list in Google Sheets with color, follow these steps:
- After setting up data validation for a column, click on the circle next to the category name.
- Choose a color for the category.
- Click “Done” to save the changes.
Summary
Adding categories in Google Sheets is a simple and effective way to organize your data.
By following these step-by-step instructions, you can easily create a drop-down menu of categories to track and categorize your information.
Here’s how to add categories in Google Sheets:
- Create a new column for your categories.
- Select the cells within the category column.
- Navigate to Data > Data validation.
- Click on “+ Add rule” in the “Data validation rules” panel.
- In the “Criteria” menu, select “Drop-down”.
- Enter your first category in the “Option 1” field.
- Click “Add another item” to add more categories.
- Customize the option colors if needed.
- Click “Done” to save your settings.
- Test the category feature in the newly created column.

