Would you like to learn how to animate bullets in Google Slides?
When presenting information in Google Slides, it is always advisable to break down lengthy paragraphs into concise bullet points as it facilitates both presentation and comprehension.
By animating bullet points, you can introduce each point individually, allowing you to explain the first point, reveal the second one, elaborate on it, and then proceed to the third point, and so on.
Animation adds an element of fun to your presentation.
In this article, you will discover how to animate bullets in Google Slides.
Also read: (opens in new tab)
How to Lock an Image in Google Slides
How to Add Your Bitmoji to Google Slides
How to Select Multiple Slides on Google Slides
How to Make Yourself Anonymous on Google Docs
Google Slides Animate Bullets
Step 1: Insert and select the bullet points
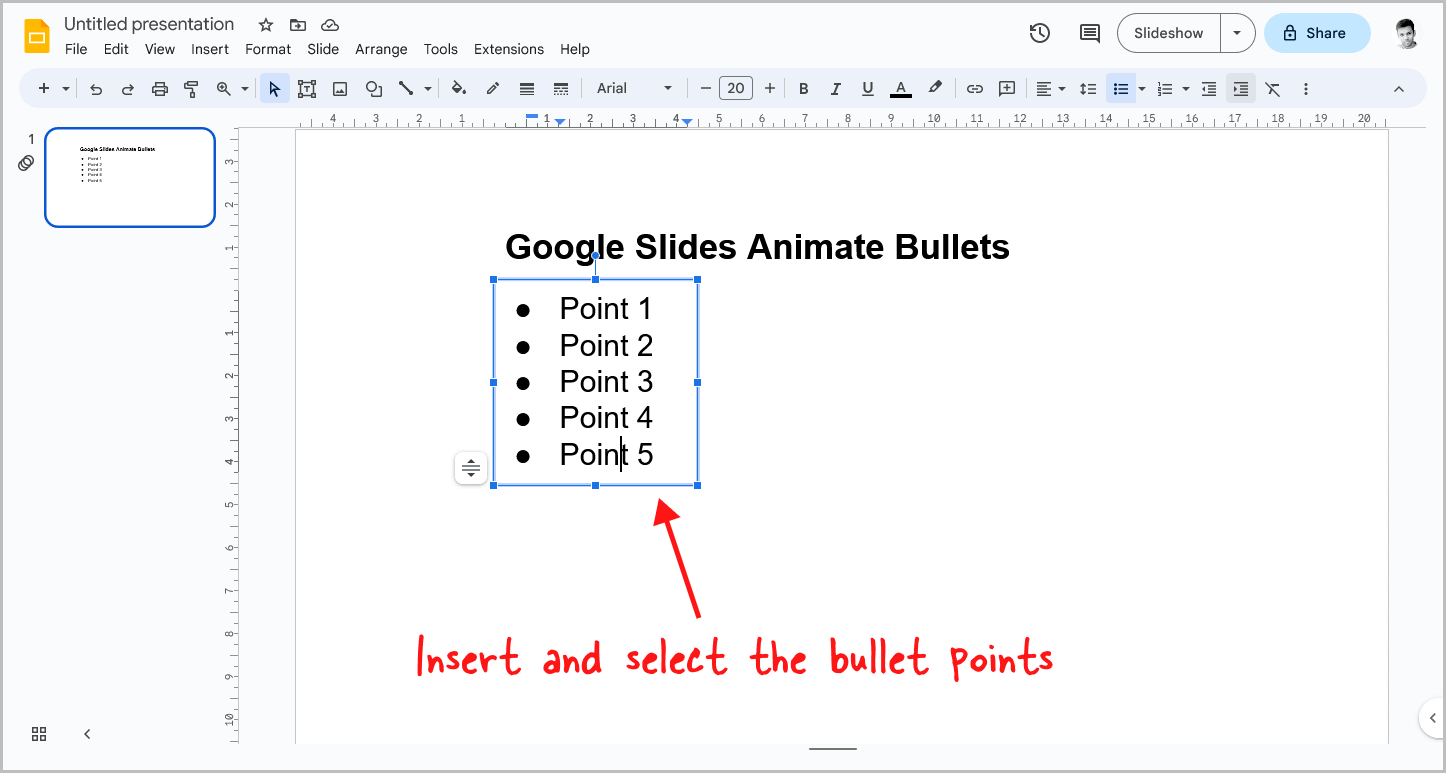
The first step is to open the slide and insert the bullet points.
If you have already done so, simply click on it to select it and move on to the next step.
To insert bullet points in Google Slides, click the “Text box” tool in the toolbar and then click on the slide.
Next, select the “Bulleted list” tool from the toolbar and begin entering the points.
To select the bullet points, simply click on them.
Ensure that the bullet points box has a blue border, indicating that they are selected.
Step 2: Right-click and select “Animate”
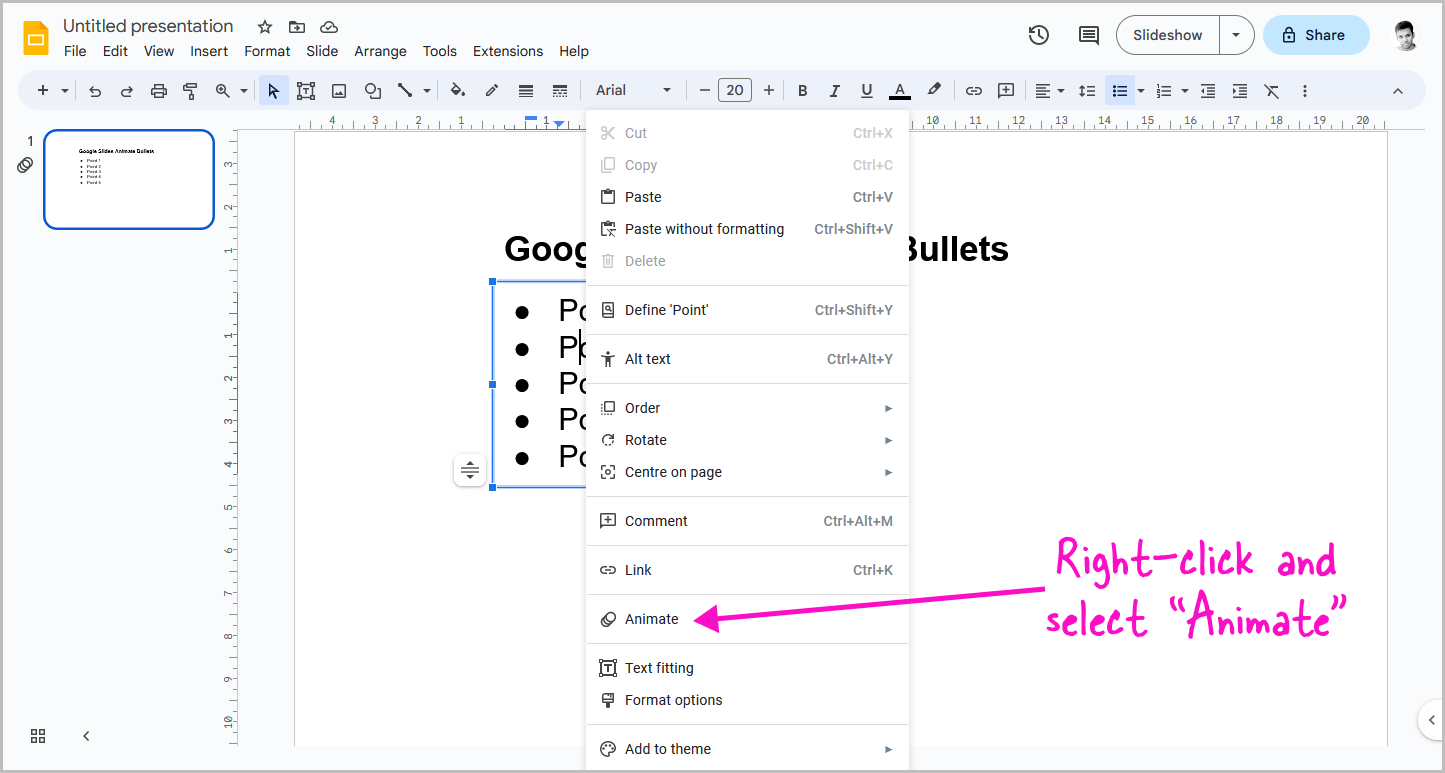
Once you have selected the bullet points, it’s time to initiate the animation.
Right-click on the selected bullet points and choose “Animate” from the context menu.
Step 3: Select animation type
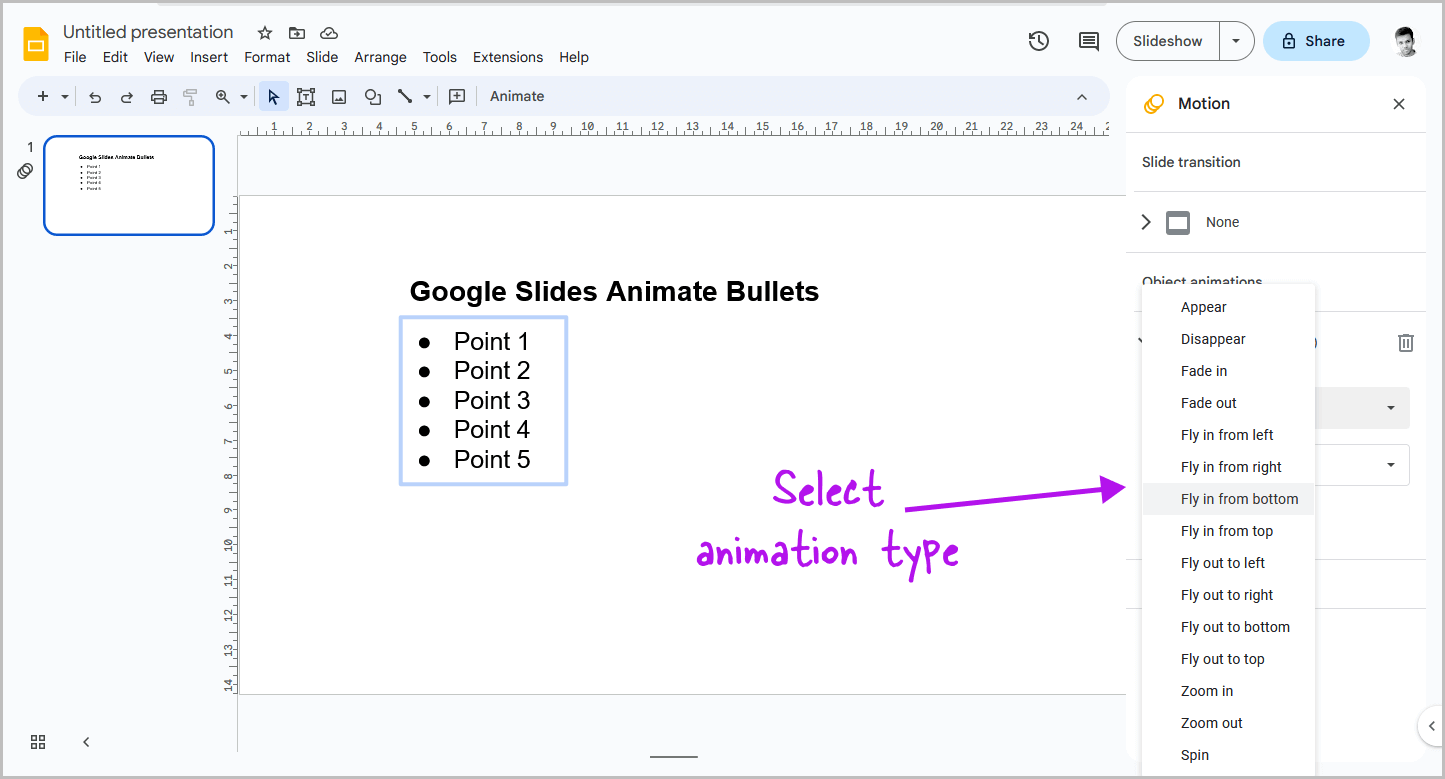
Google Slides offers a wide range of animation styles to choose from.
By default, the “Appear” animation style is selected.
If you wish to change the style, click on the “Appear” animation option below the “Object animations” title in the sidebar.
From the drop-down menu, select your preferred animation.
Personally, I recommend the “Fly in from bottom” animation for bullet points.
Step 4: Set the start condition
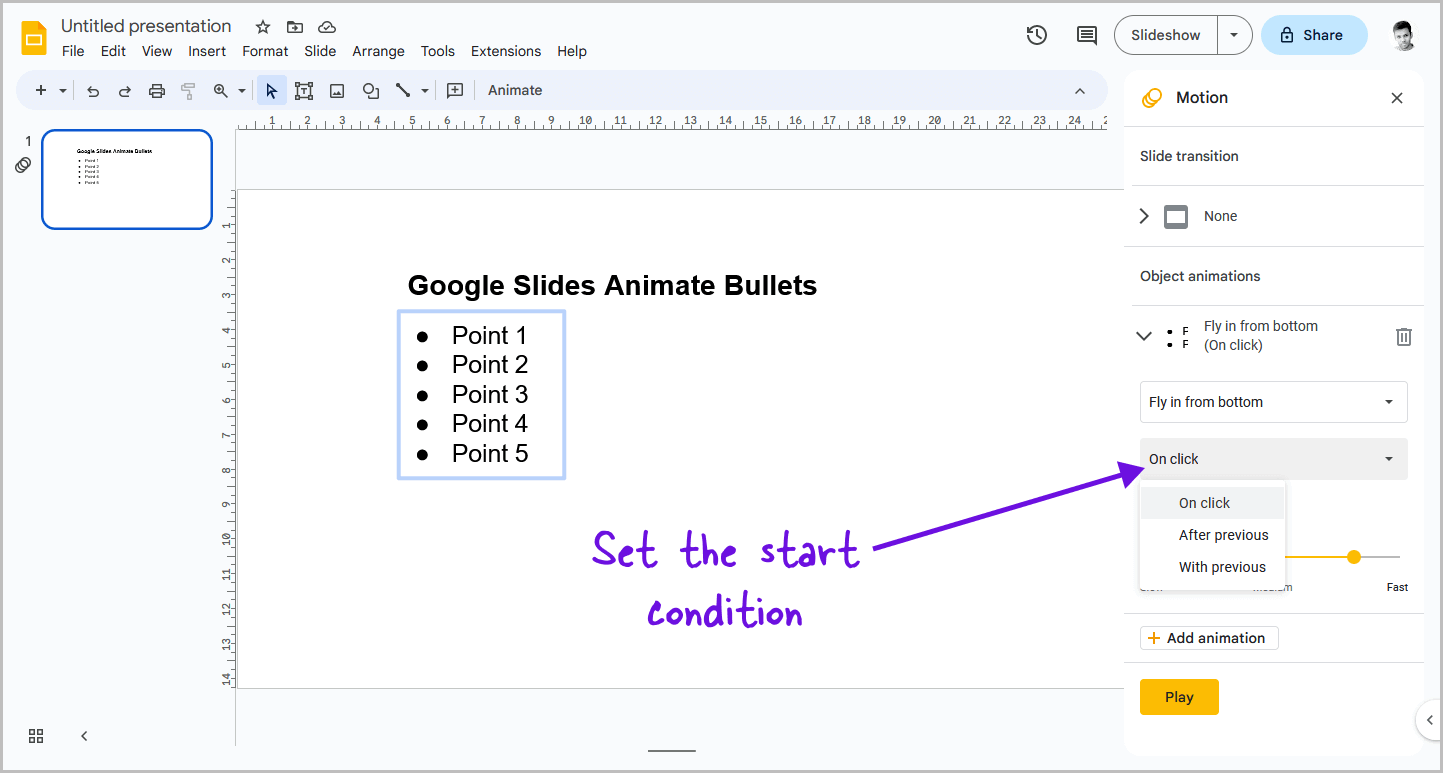
Below the animation type menu, you’ll find the start condition menu.
The default condition is “On click,” which initiates the animation only when you click on the slide or press the Spacebar or Enter key on your keyboard.
If you have existing animation on the slide, such as an animated heading for the bullet points, you can select “After previous” to load the bullet points after the heading animation.
Alternatively, choose “With previous” if you want the bullet points to load simultaneously with the heading animation.
However, I would recommend sticking with the “On click” option as it provides more control over the animation.
Step 5: Enable “By paragraph” option
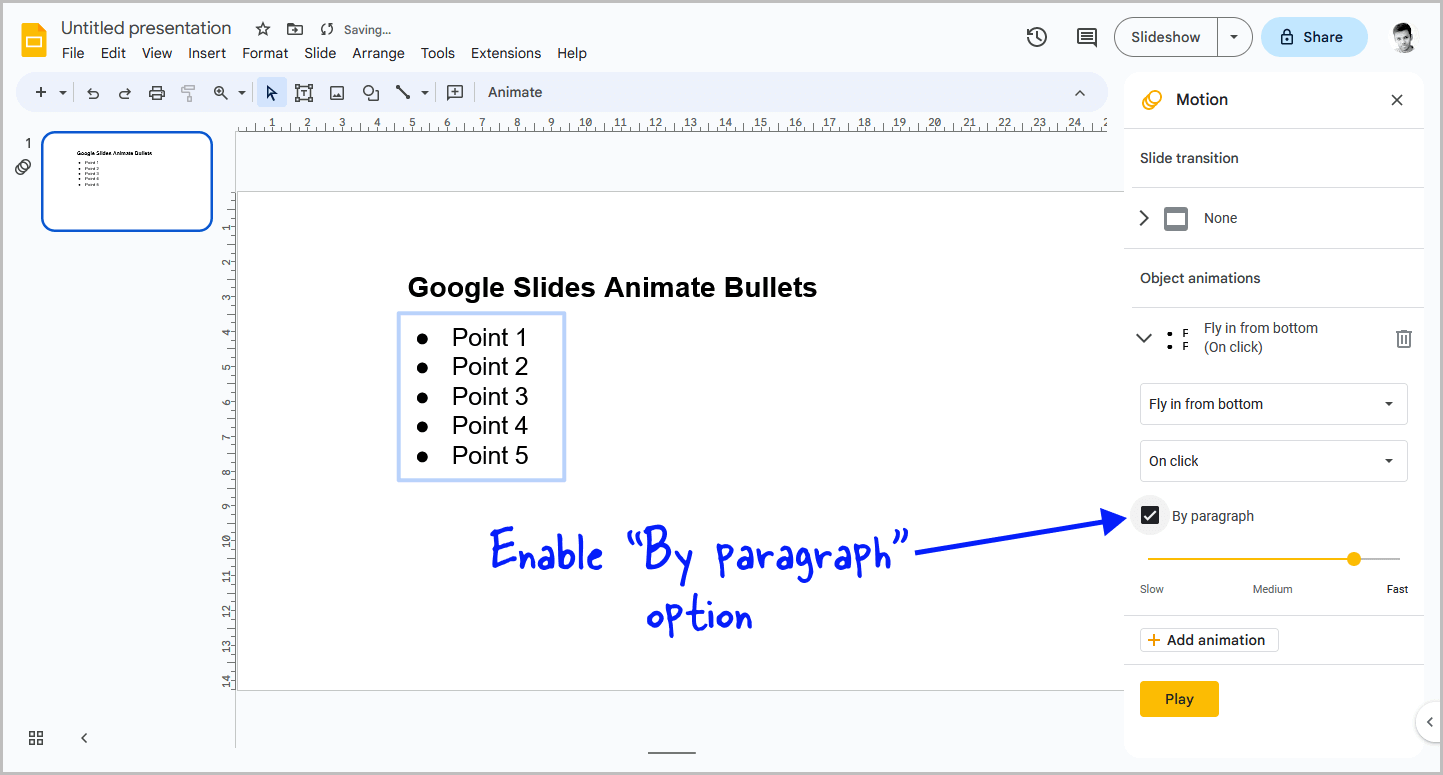
One of the most crucial settings when animating bullet points is the “By paragraph” option.
Enabling this option allows you to load the bullet points one by one.
For instance, if you have selected the “On click” option in the previous step and enabled “By paragraph,” during the presentation, you will need to click on the slide to load the first bullet point, click again to load the second point, and repeat this process for each subsequent point.
This setting is particularly useful when you want to explain the points individually to your audience.
However, if you prefer to load all the bullet points simultaneously, you can simply uncheck the “By paragraph” option.
Step 6: Click “Play”
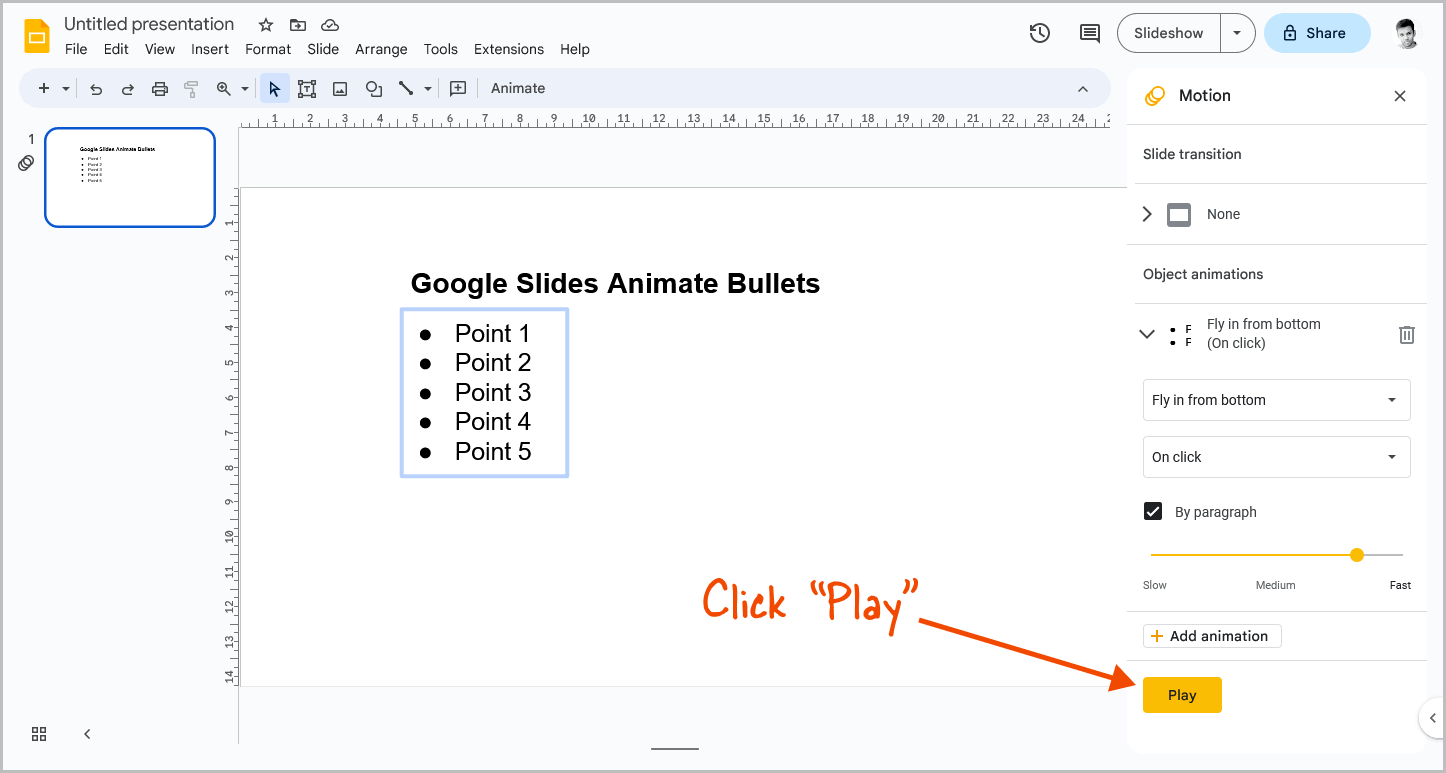
Lastly, click the “Play” button to preview the animation.
Click on the slide to initiate the animation and make necessary adjustments based on your requirements.
If the animation seems too fast or too slow, you can fine-tune the speed using the slider in the sidebar.
You may also decide to change the animation style.
Ensure that the animation is flawless and test it by clicking the “Slideshow” button on the top right corner of the page before the final presentation.
FAQs
How Do You Animate a List in Google Slides?
To animate a list in Google Slides, simply select the bullet points, right-click, choose “Animate,” select an animation style, enable “By paragraph,” and click “Play.”
How Do You Make Bullet Points Appear on Click in Google Slides?
To make bullet points appear on click in Google Slides, right-click on the bullet points, select “Animate,” choose an animation style, enable “By paragraph,” and select “On click” as the start condition.
How to Add Animation to Google Slides for One Bullet at a Time?
To add animation to Google Slides for one bullet at a time, enable the “By paragraph” option, select “On click” as the start condition, and click “Play” to preview the animation.
Conclusion
Animating bullet points is an excellent way to make your presentations more engaging and interactive.
Here are the steps to animate bullet points in Google Slides:
- Insert and select bullet points
- Right-click and select “Animate”
- Select animation type
- Set the start condition
- Enable “By paragraph” option
- Click “Play”
Learn how to animate bullet points in Google Slides for your next presentation! Follow these simple steps to make your slides more engaging and interactive.

