When creating documents, using columns is a great way to make them more readable and visually appealing.
Columns can help break up the text into smaller sections, making it easier for the reader to follow.
Google Docs is a popular document creation tool allowing you to add up to three columns by default.
While this is enough for most situations, there may be times when you want to add more columns to your document.
The good news is that you can use a workaround to create four or more columns in Google Docs.
This tutorial will guide you through the steps to add four or more columns to your Google Docs document.
So, let’s start and create that four-column document you want to make!
Also read: (opens in new tab)
Google Docs Columns Greyed Out
How to Rearrange Pages in Google Docs
Using a Picture as a Bullet Point in Google Docs
How to Bold Multiple Words in Google Docs
How to Make Four Columns in Google Docs?
Step 1: Go to Insert > Table > Select a 4 x 1 table
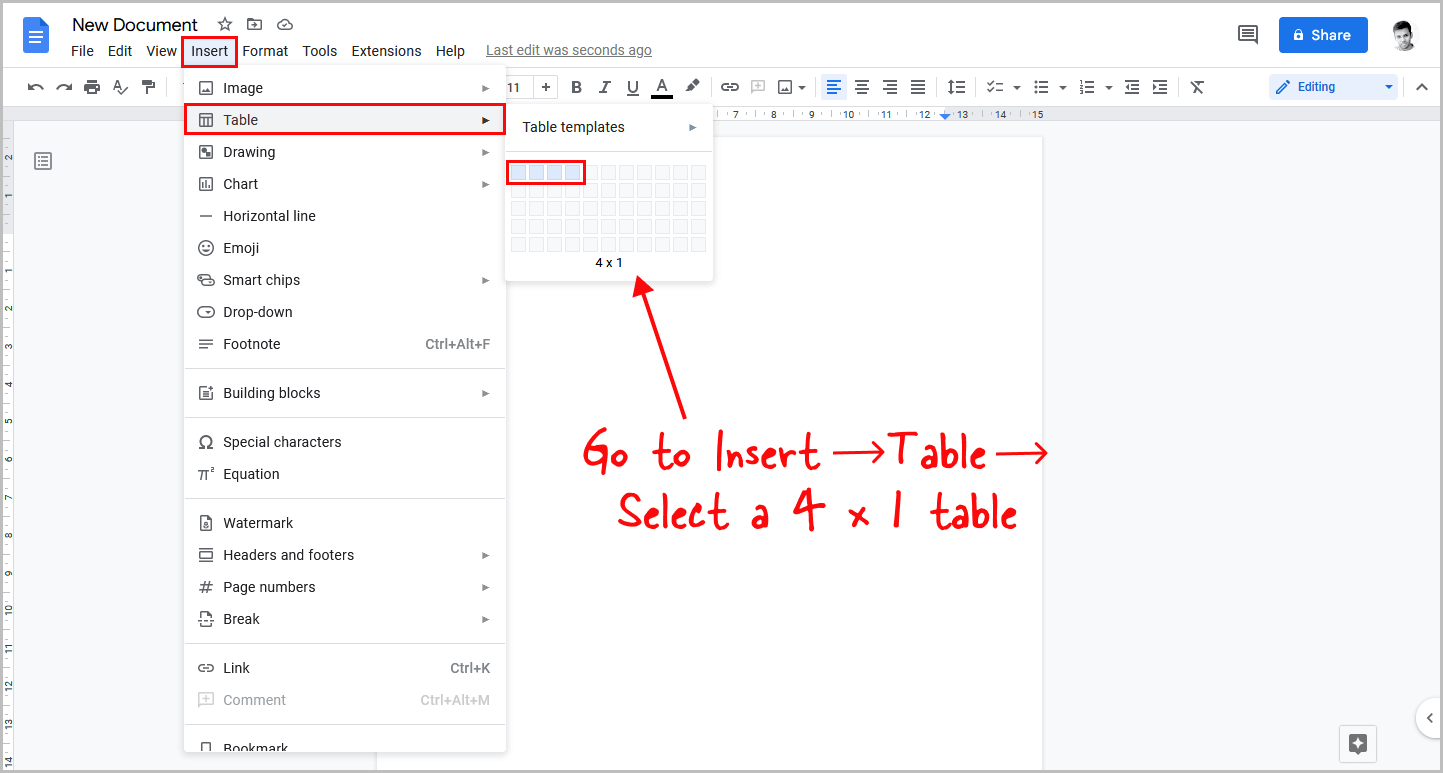
Google Docs allows you to add up to three columns.
However, we can create four columns by inserting a table and removing its border to make it look like a column.
To get started, open the document and select the “Insert” option from the top menu.
Then, choose “Table” from the drop-down menu and select a “4×1” table.
Step 2: Enter your content into the columns
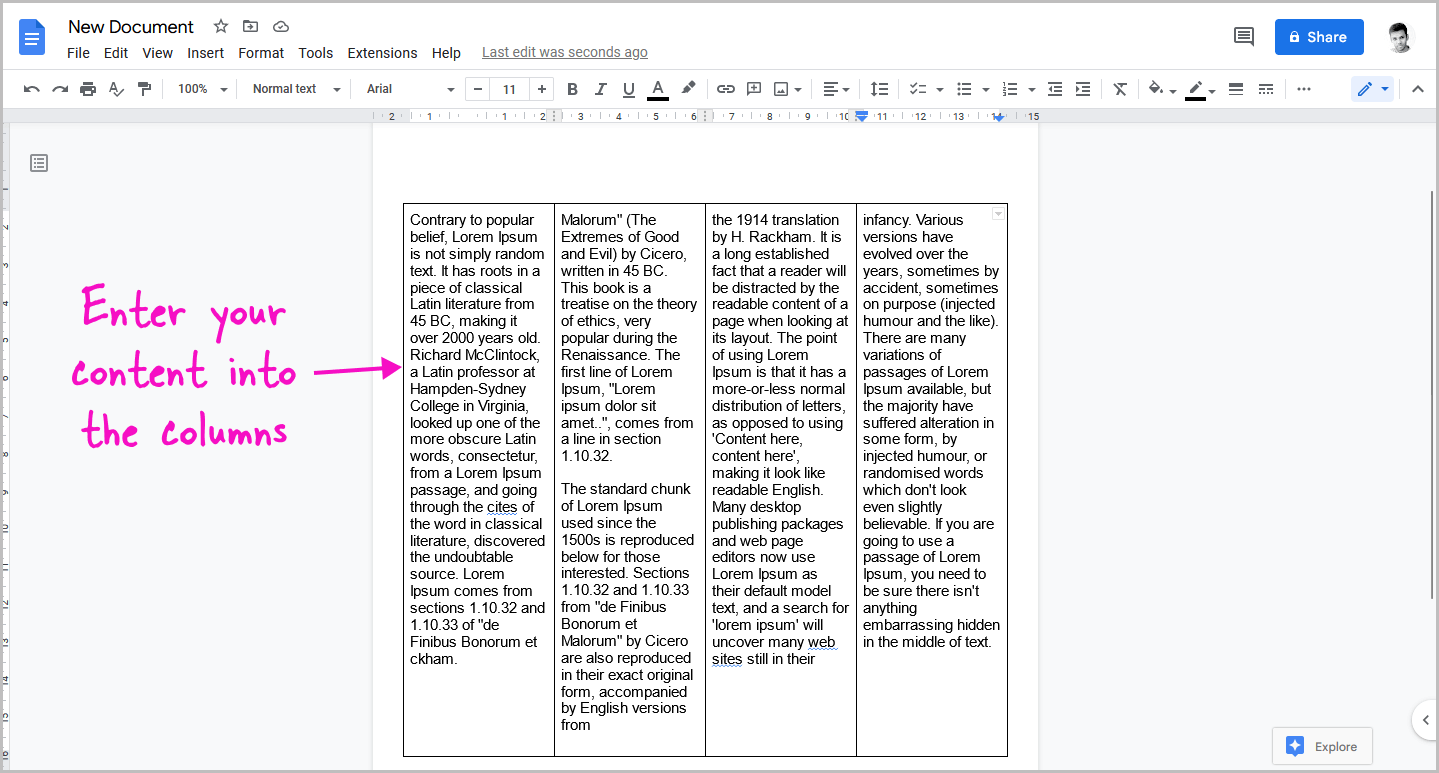
Once the table is inserted, click on the first cell and start entering your content.
The table will automatically extend to fit the content.
However, unlike the column feature, the text won’t flow automatically.
You’ll need to manually click on the second cell to start entering content in the second column and so on.
Step 3: Go to Format > Table > Table properties
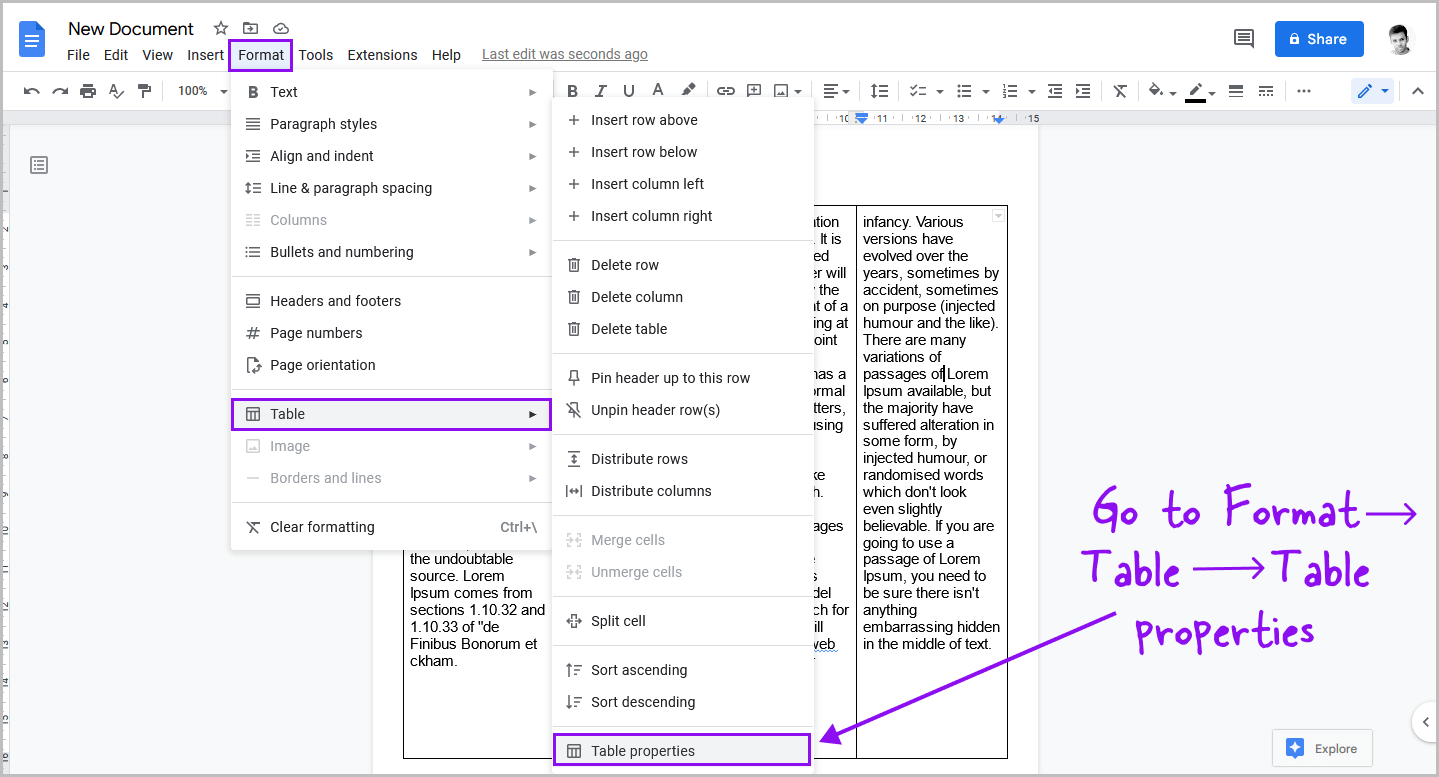
After entering the text, it is important to remove the table border to give it a more polished look.
To do so, simply click anywhere inside the table, and then select the “Format” option from the top menu.
From there, select the “Table” option from the drop-down menu, and then finally select the “Table properties” option from the secondary drop-down menu.
Step 4: Select the “Color” setting
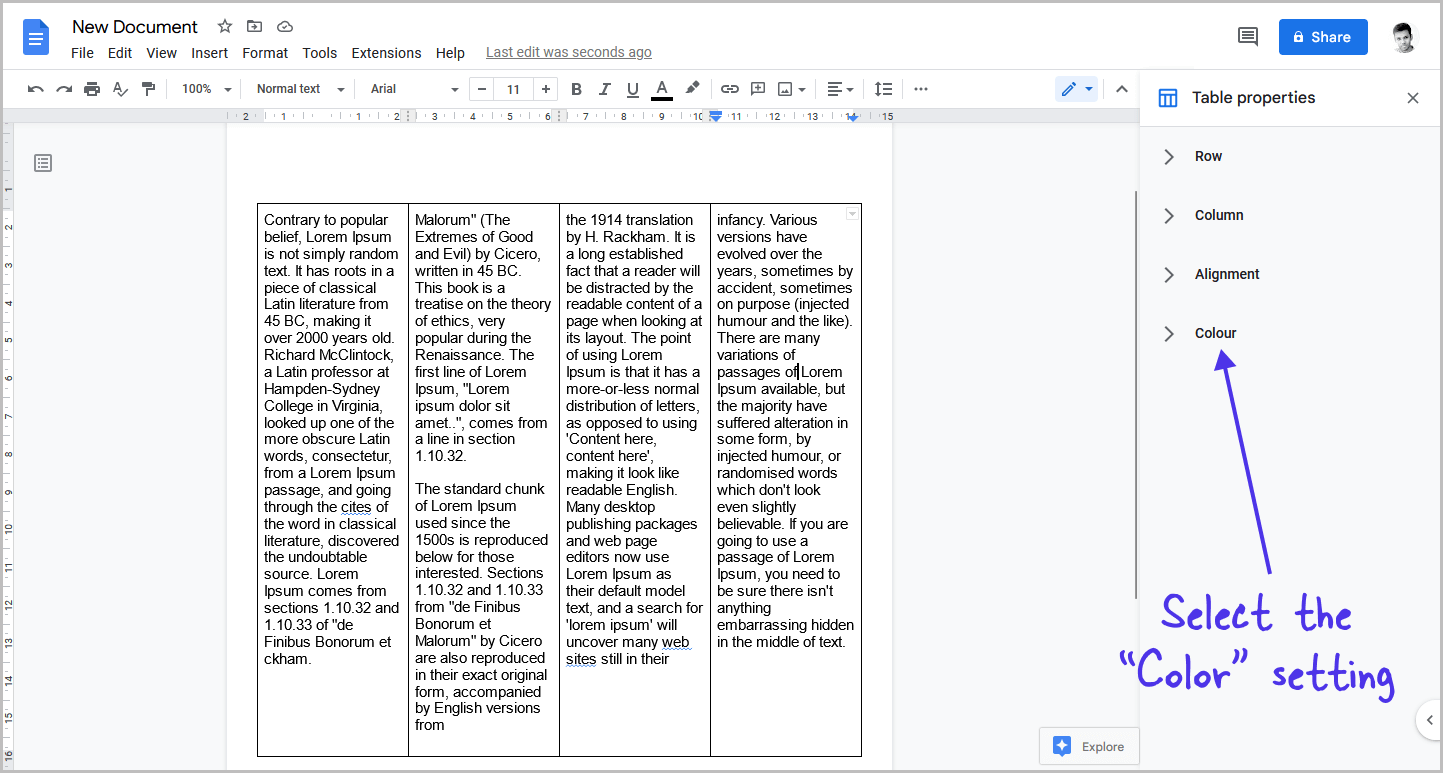
After selecting the “Table properties” option, a panel will appear on the right side of your document.
This panel will display four settings: Row, Column, Alignment, and Color.
From this list, click on the “Color” setting.
Step 5: Set the border width of the table to “0pt”
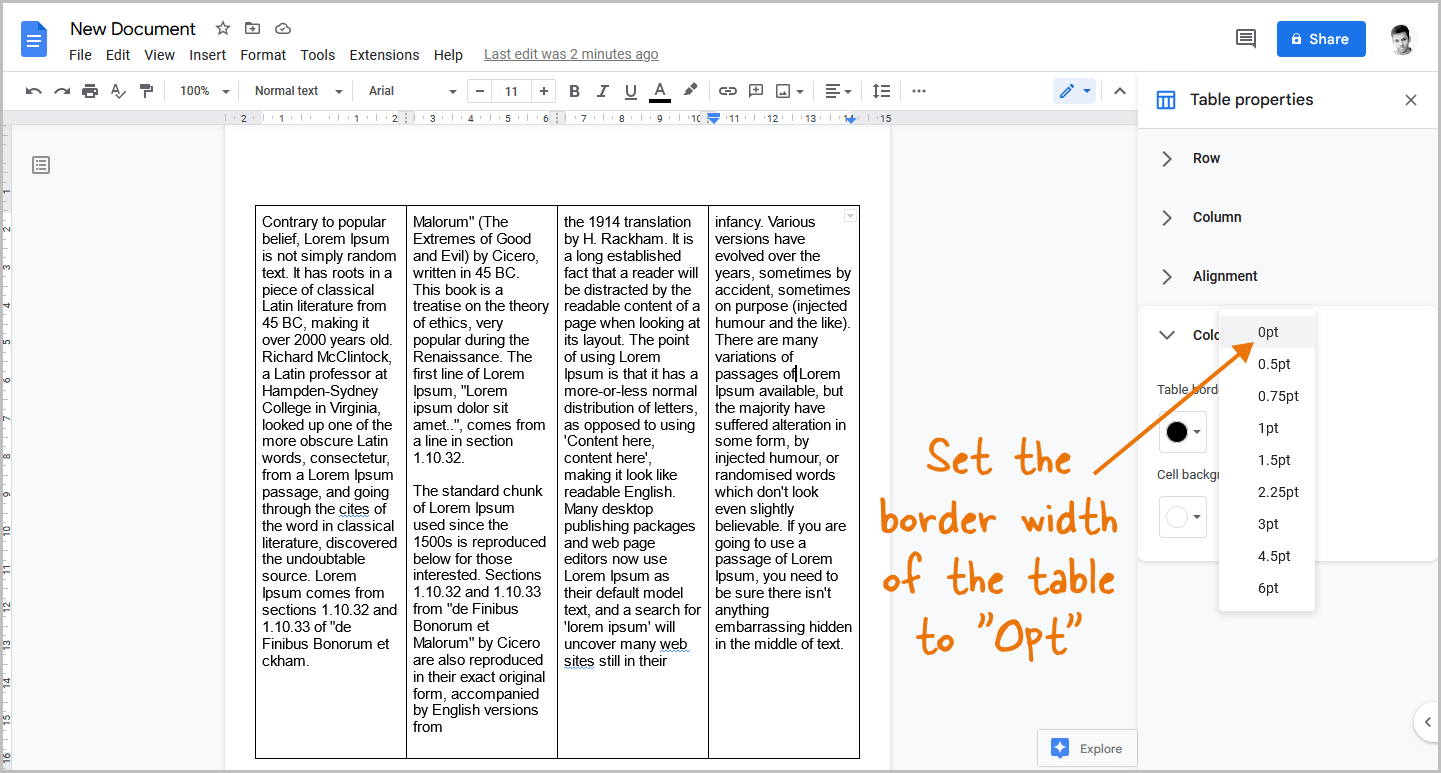
Under the “Color” setting, you will find three options: Table Border Color, Table Border Width, and Table Cell Color.
By default, the border color is set to black, the border width to 1pt, and the cell color to white.
To remove the table border, simply select “0pt” from the drop-down menu in the border width settings.
Alternatively, you can set the border color to match the document’s background color. For example, if your document’s background is white, select white as the border color.
Step 6: Set the column width to “4cm”
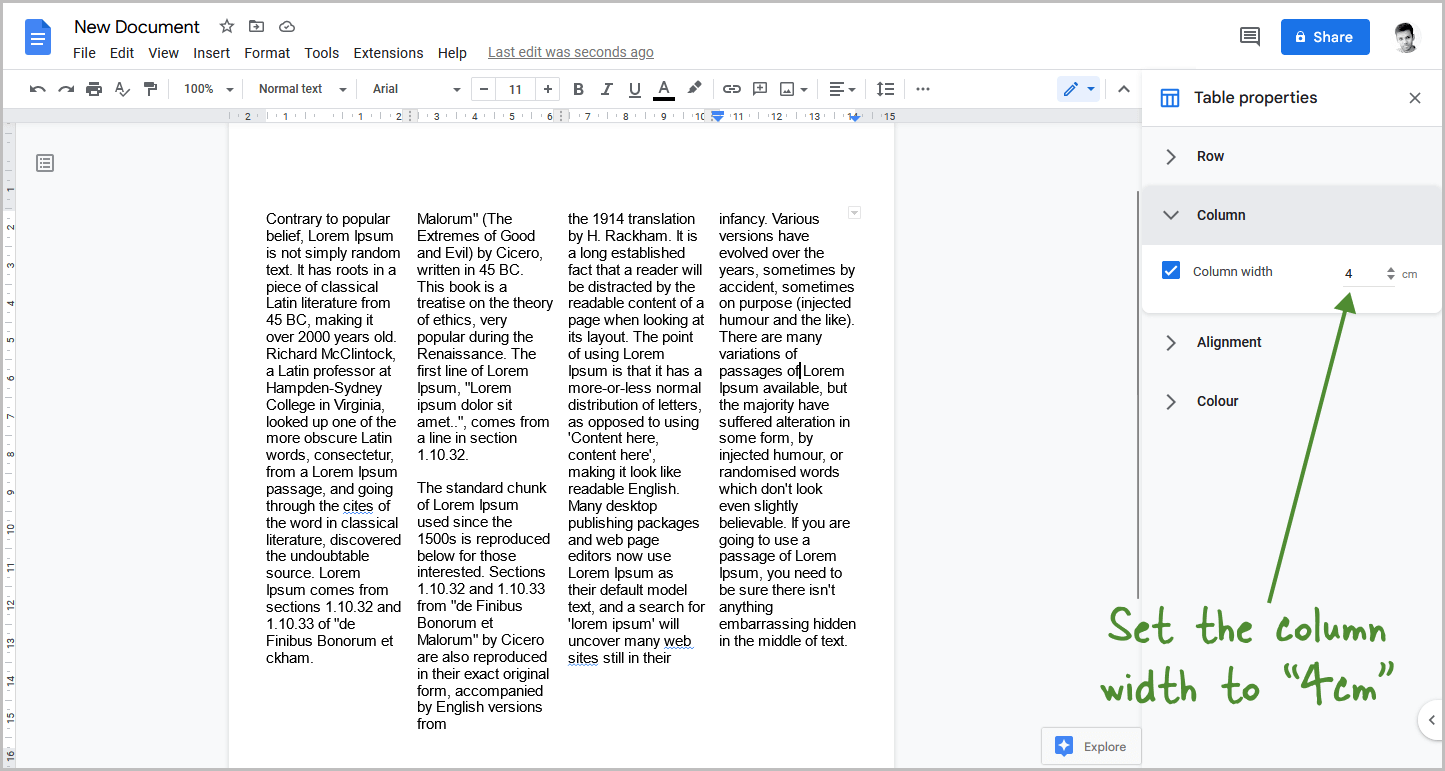
This is an optional step and can be skipped if desired.
If your table looks compressed, you can increase the width of each column.
To do so, click anywhere inside the first column, then select “Column” from the “Table properties” side panel.
Check the “Column width” box and set the width to “4 cm”. Repeat this process for the second column and beyond.
You can increase the width to more than 4 cm, but be aware that your content may fall outside the page.
4 cm is the best column width for a 4-column layout. Adjust the numbers as needed to achieve the best fit for your document.
FAQs
How Many Columns Can You Make in Google Docs?
By default, Google Docs allows you to add up to three columns. However, by using a table, you can create four or more columns in your document.
More Than 3 Columns in Google Docs
To create more than 3 columns in Google Docs, you can use a table. Simply insert a table with the desired number of columns and then enter your content into each column. You can then format the table to remove the borders and create the appearance of multiple columns.
How to Make 3 Columns in Google Docs?
To make three columns in Google Docs:
Step 1: Click on “Format” in the top menu
Step 2: Click on “Columns”
Step 3: Select “Three” from the drop-down menu
How to Make 4 Columns in Google Docs?
To make four columns in Google Docs:
Step 1: Go to Insert > Table > Select a 4 x 1 table
Step 2: Enter your content into the columns
Step 3: Go to Format > Table > Table properties
Step 4: Select the “Color” setting
Step 5: Set the border width of the table to “0pt”
Conclusion
In conclusion, while Google Docs only allows you to add up to three columns by default, you can use the workaround described in this tutorial to create four or more columns.
Simply insert a table with the desired number of columns, enter your content, and format the table to remove the borders.
With these steps, you can create a visually appealing and organized document that is easy to read and understand.

