Do you want to learn how to create a vertical line in Google Docs?
While you can easily find the “Horizontal line” option by going to the Insert option in the top menu, there is no direct option to add a vertical line in the menu.
Many users insert the “|” symbol and press enter, then repeat the process until they have a vertical line of the desired height.
However, this method creates a dotted vertical line and may cause editing issues later.
But don’t worry!
In this article, I’ll explain the correct way to create a vertical line in Google Docs, step-by-step.
Also read: (opens in new tab)
How to Make Four Columns in Google Docs
How to Make Horizontal Line Thicker in Google Docs
How to Add Dotted Line in Google Docs
How to Extend Horizontal Line in Google Docs
How to Double Underline in Google Docs
How to Create Vertical Line in Google Docs
Short answer: To create a vertical line in Google Docs, go to Insert > Drawing > New. Choose the “Line” tool and, while holding down the Shift key, draw a vertical line. Click on Save and close. Finally, adjust the location and size as needed.
Here is a step-by-step guide on how to create a vertical line in Google Docs:
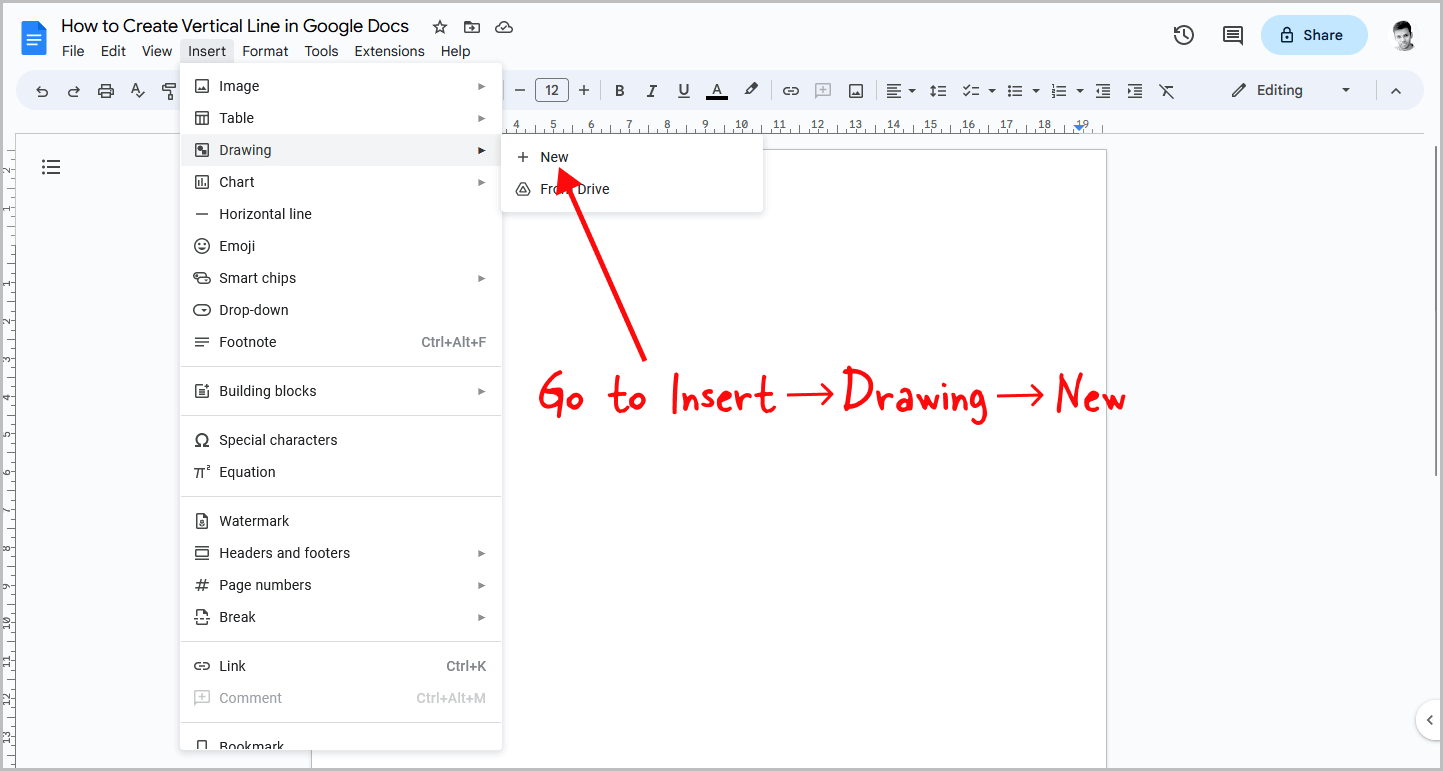
Step 1: Go to Insert > Drawing > New
The first step is to open the Google Doc where you want to insert a vertical line.
From the top menu, click on “Insert,” then choose “Drawing” from the drop-down menu.
Next, select “New” from the secondary drop-down menu that appears.
Step 2: Click on the “Line” tool from the drawing toolbar
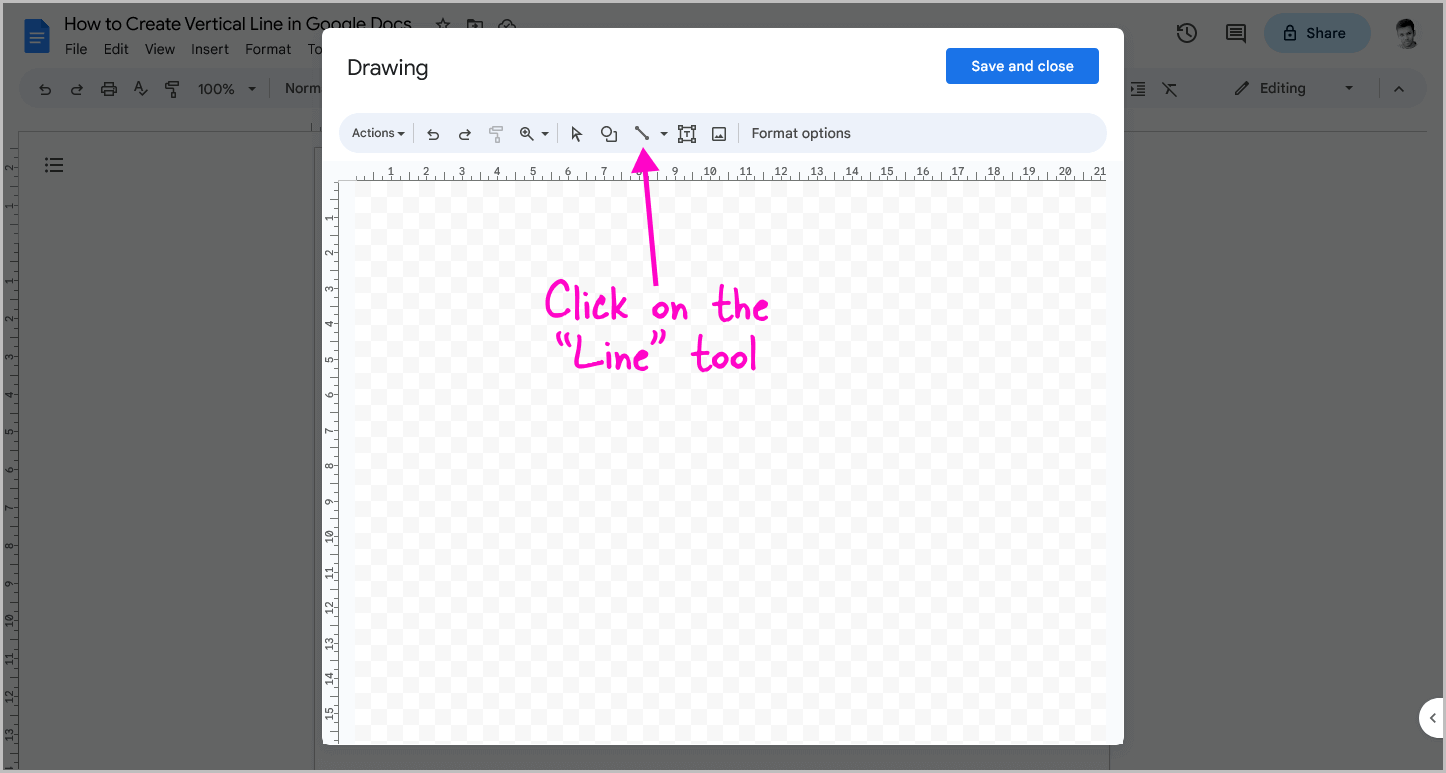
You will see a Drawing pop-up window containing a canvas.
Above the canvas, there is a toolbar.
Click on the “Line” tool in the toolbar.
Step 3: Hold down the shift key and draw a vertical line
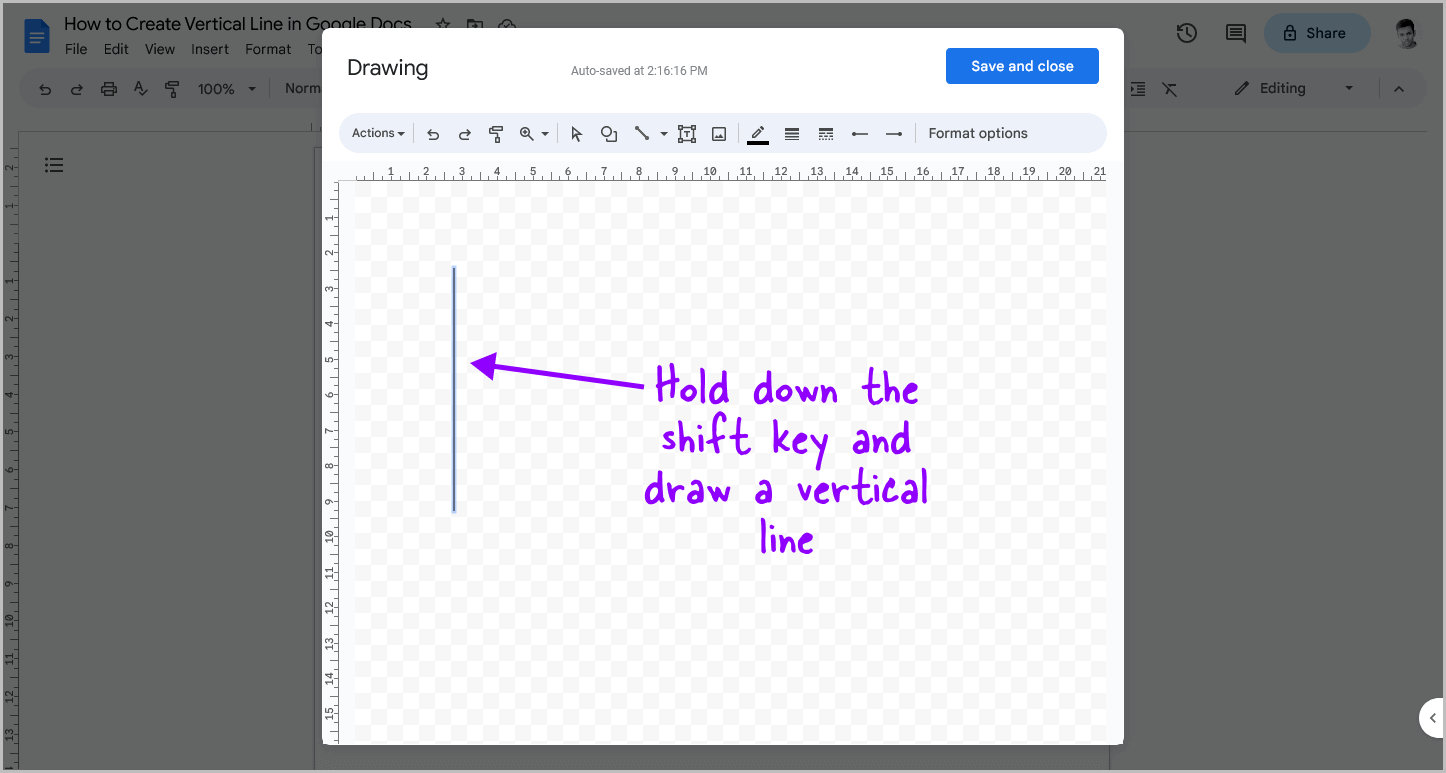
After selecting the “Line” tool, hold down the Shift key on your keyboard and left-click on the canvas.
While clicking, drag the cursor downwards to draw the line.
Release the mouse click to end the line.
Holding down the Shift key is important to ensure a perfectly straight line.
If you draw a line without holding the Shift key, you’ll notice that the line is not straight but instead tilted at an angle.
Note that the length and width of the line are not important in this step, as they can be adjusted later. Simply draw a straight vertical line and proceed to the next step.
Step 4: Click on the “Save and close” button
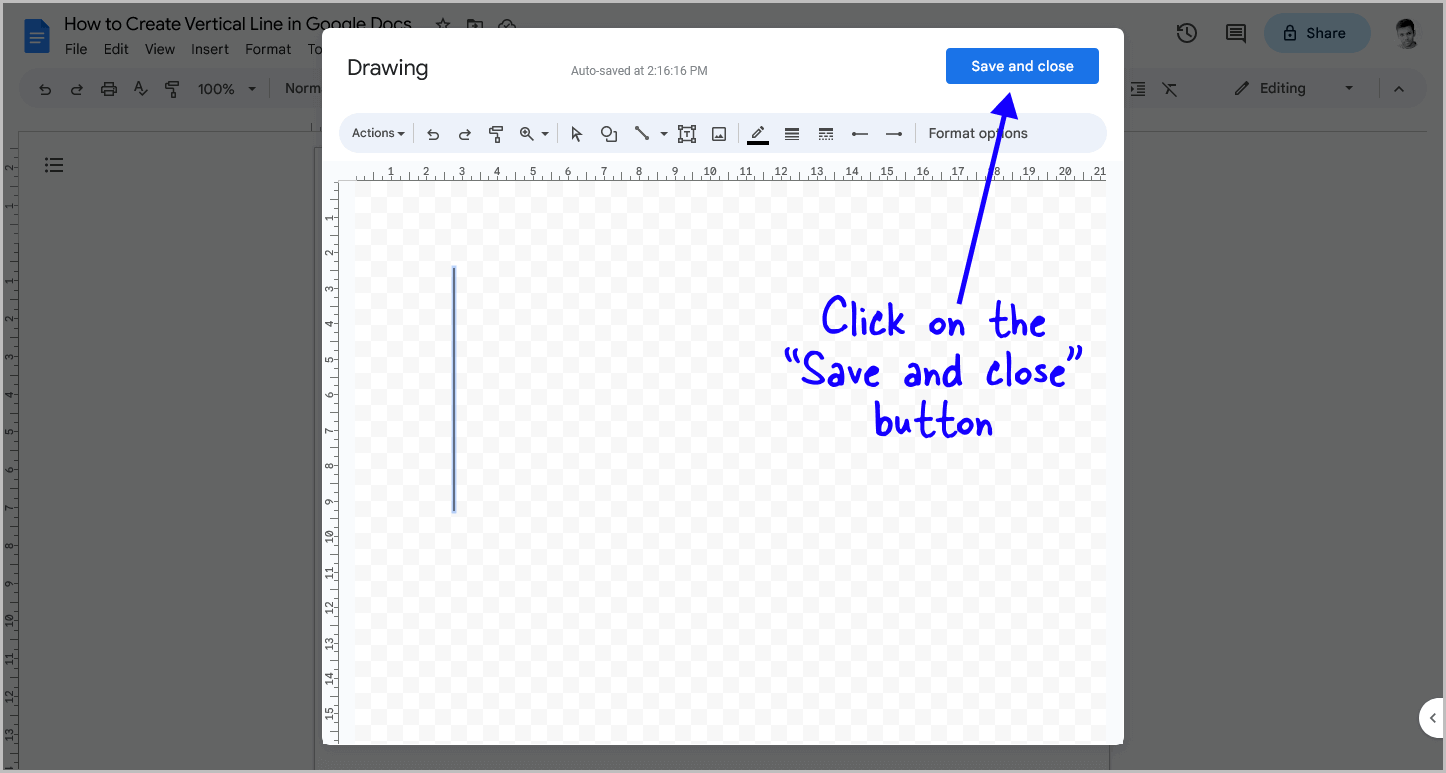
Now, click on the “Save and close” button located at the top right of the pop-up window to insert the line onto the document page.
Step 5: Click on the three dots and select “All image options”
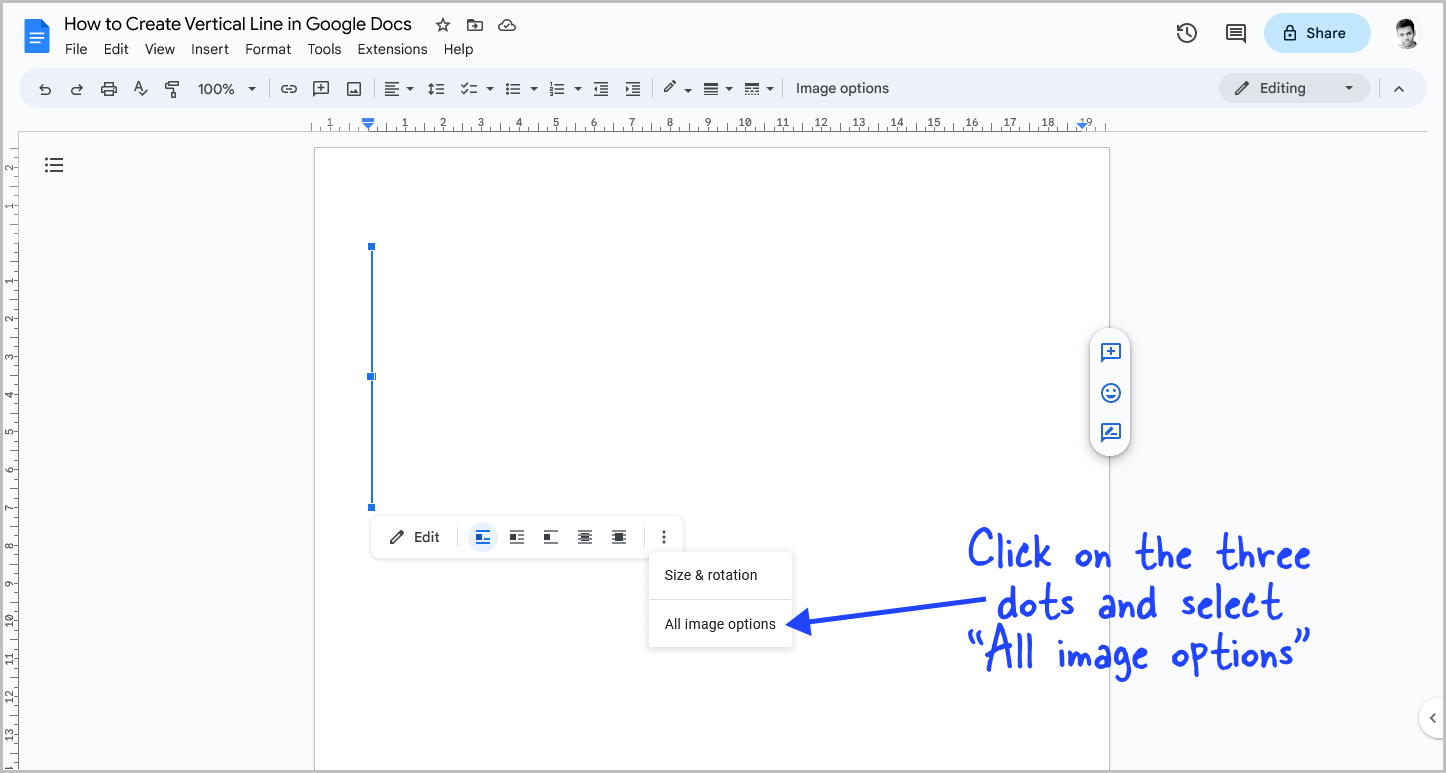
After inserting the vertical line, it is time to adjust its height and thickness.
Start by clicking on the line to select it.
Next, click on the three dots at the end of the small panel located just below the line.
Finally, select “All image options” from the drop-down menu and proceed to the next step.
Step 6: Select “Size and rotation”
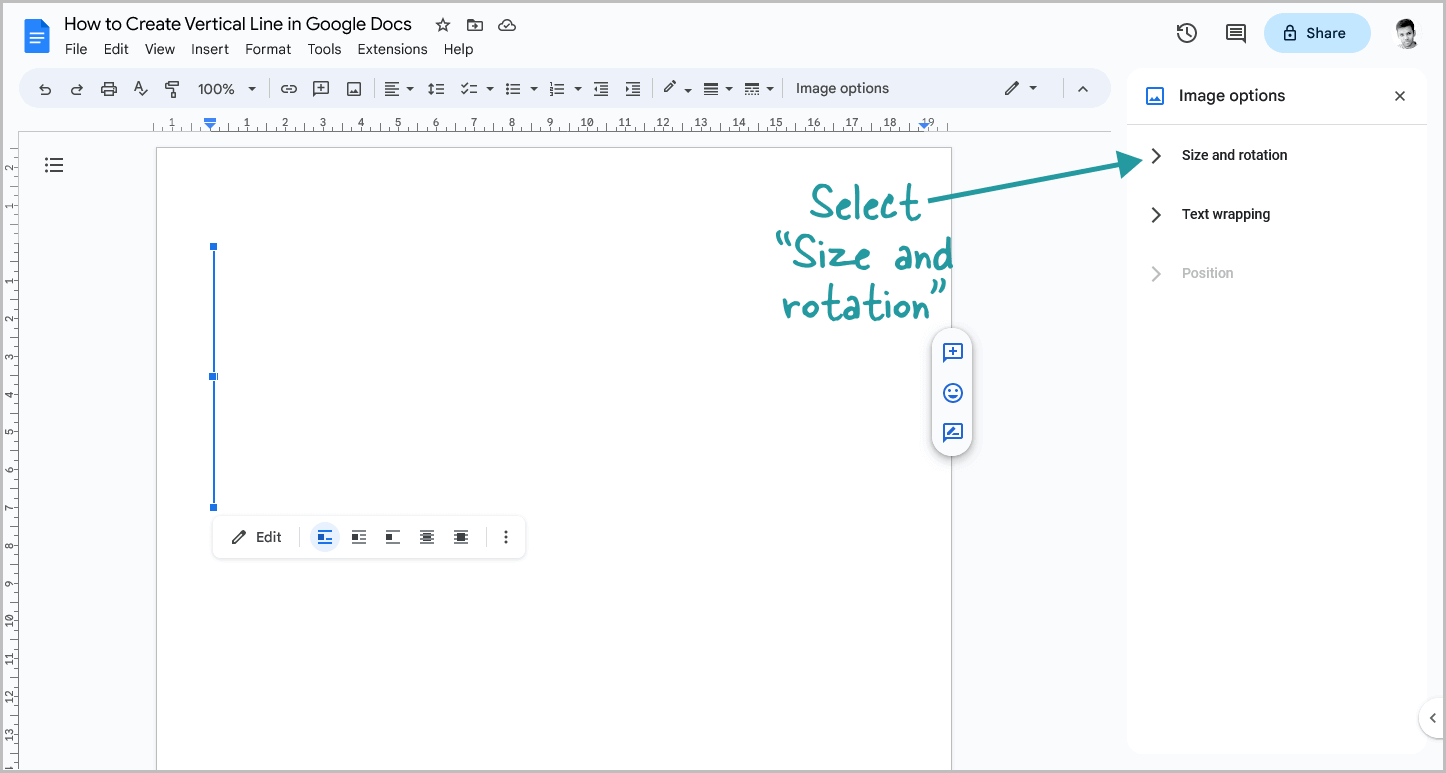
You will now see the “Image options” panel on the right side of the document.
This panel contains two settings: “Size and rotation,” “Text wrapping,” and “Position.”
Select the “Size and rotation” settings and proceed to the next step.
Step 7: Uncheck the “Lock aspect ratio” box
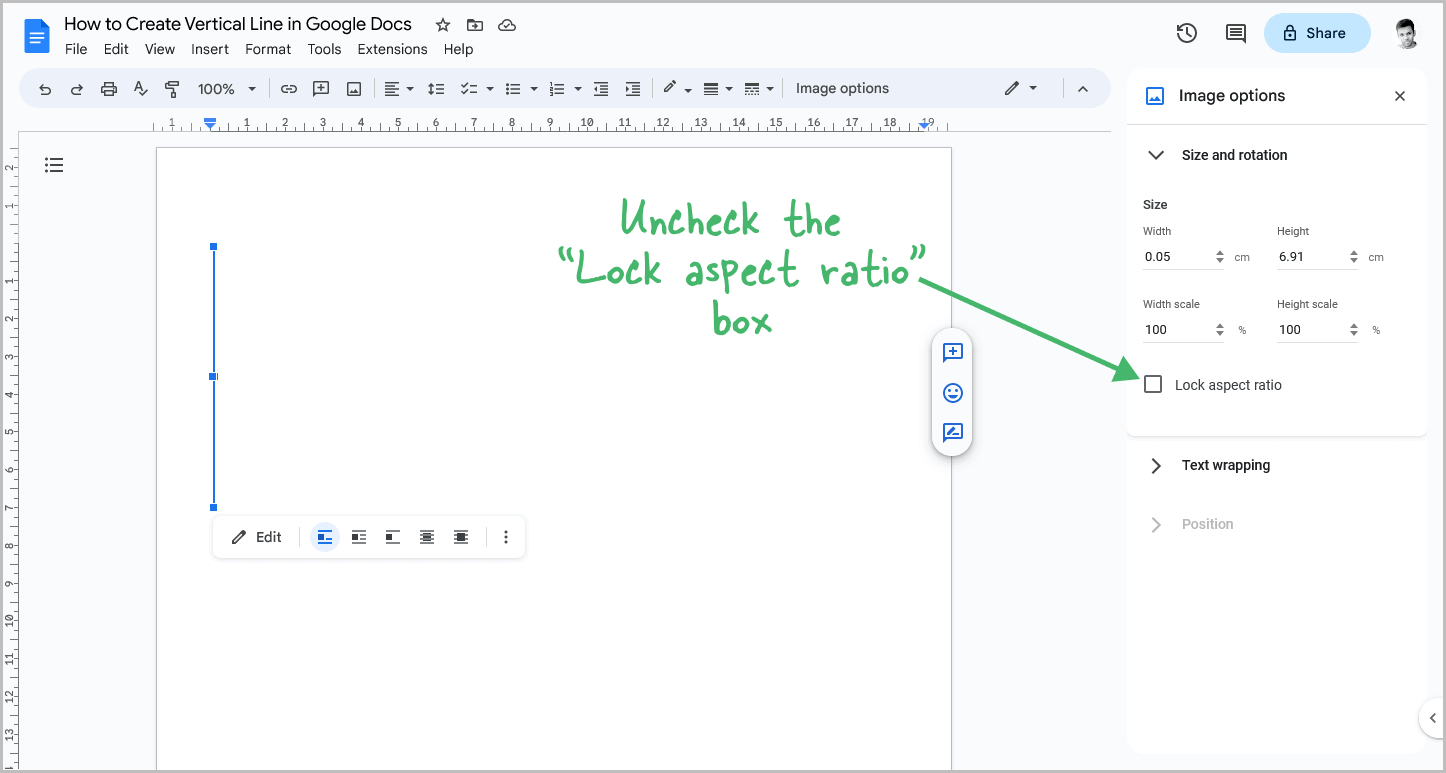
In the “Size and Rotation” settings, you will see that the “Lock aspect ratio” box is checked by default.
Click on this box to uncheck it, so that you won’t face any issues in the later steps while adjusting the width and height of the vertical line.
Step 8: Adjust the width and the height of the line
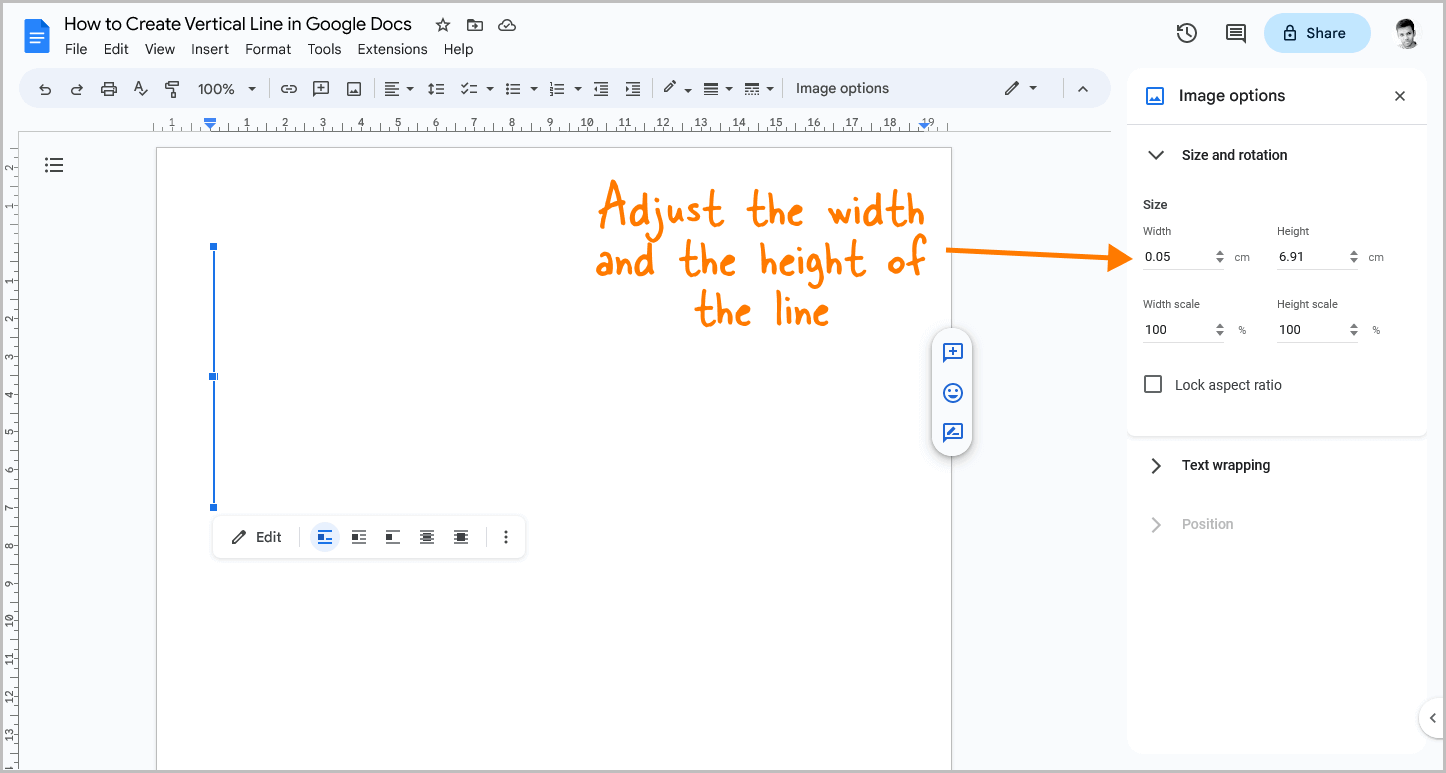
Below the “Size” settings, you will see the width and height fields.
Enter your desired width and height values until you achieve the desired vertical line with the perfect dimensions.
It is recommended to keep the line thickness at or below 1 cm to maintain aesthetics.
I personally prefer a thickness of “0.05 cm”, but the height can be adjusted to suit your needs.
Step 9: Click on the “Text wrapping” settings
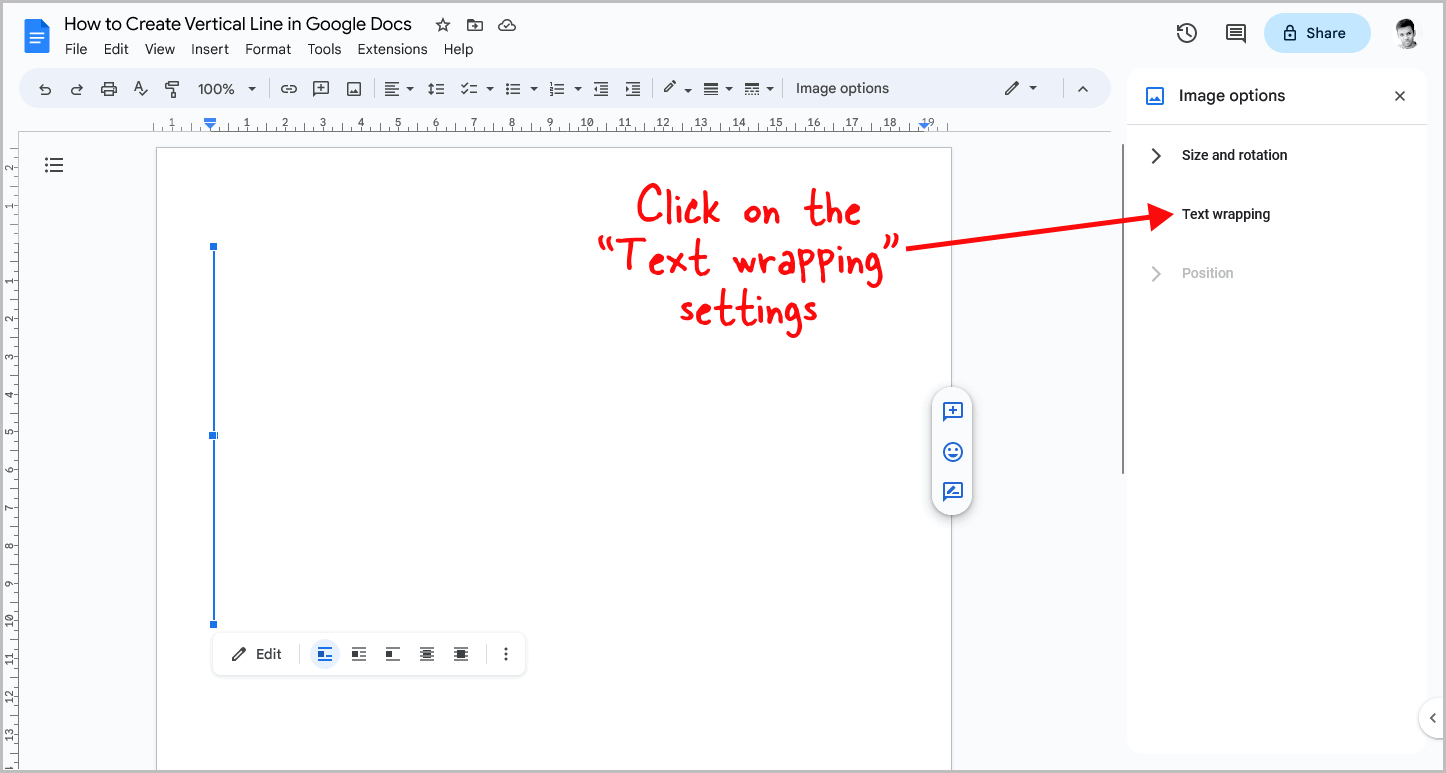
Next, click on the “Text wrapping” settings in the “Image options” panel.
Step 10: Choose “In front of text”
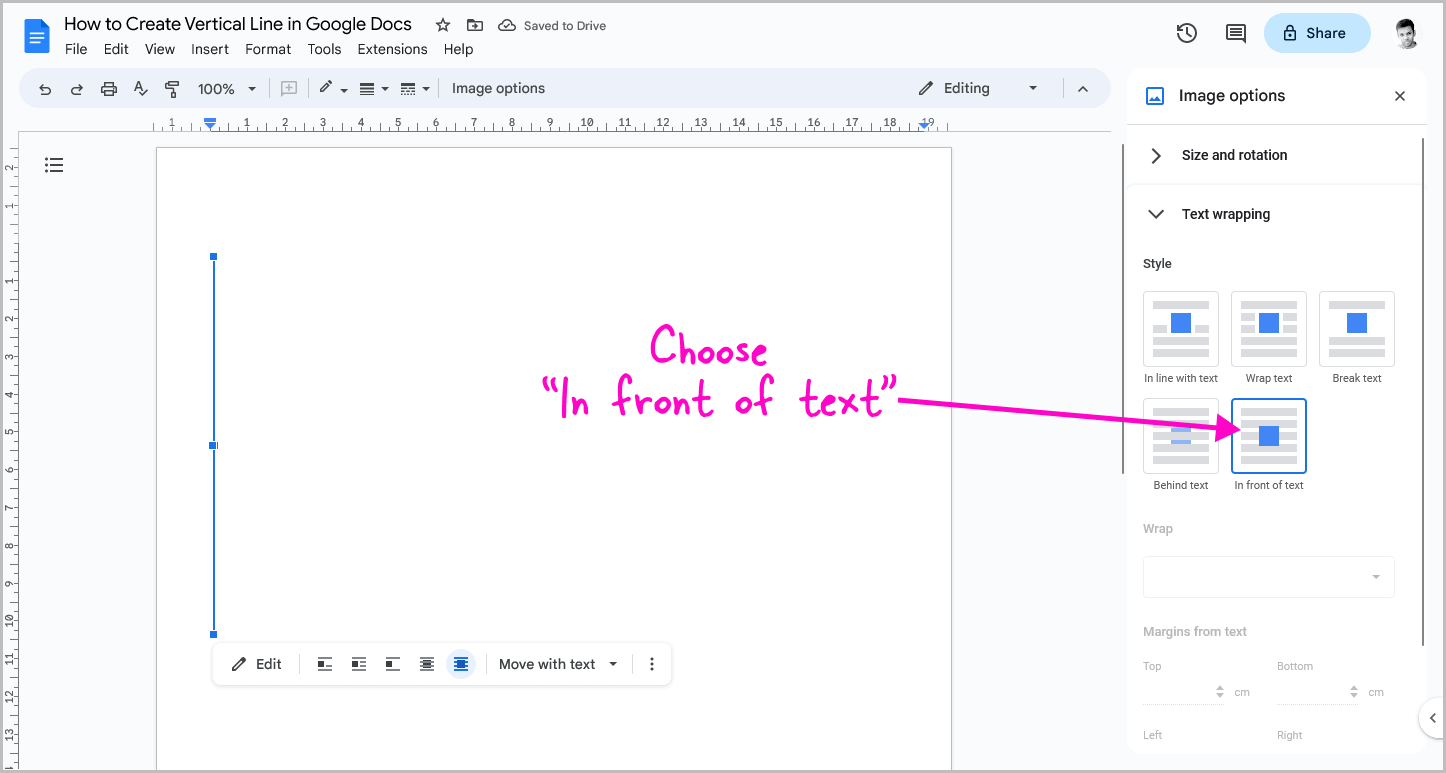
Select “In front of text” from the list of options.
This is an important step as it allows you to move the vertical line freely to any location on the page.
Step 11: Drag the vertical line to the desired location on the page
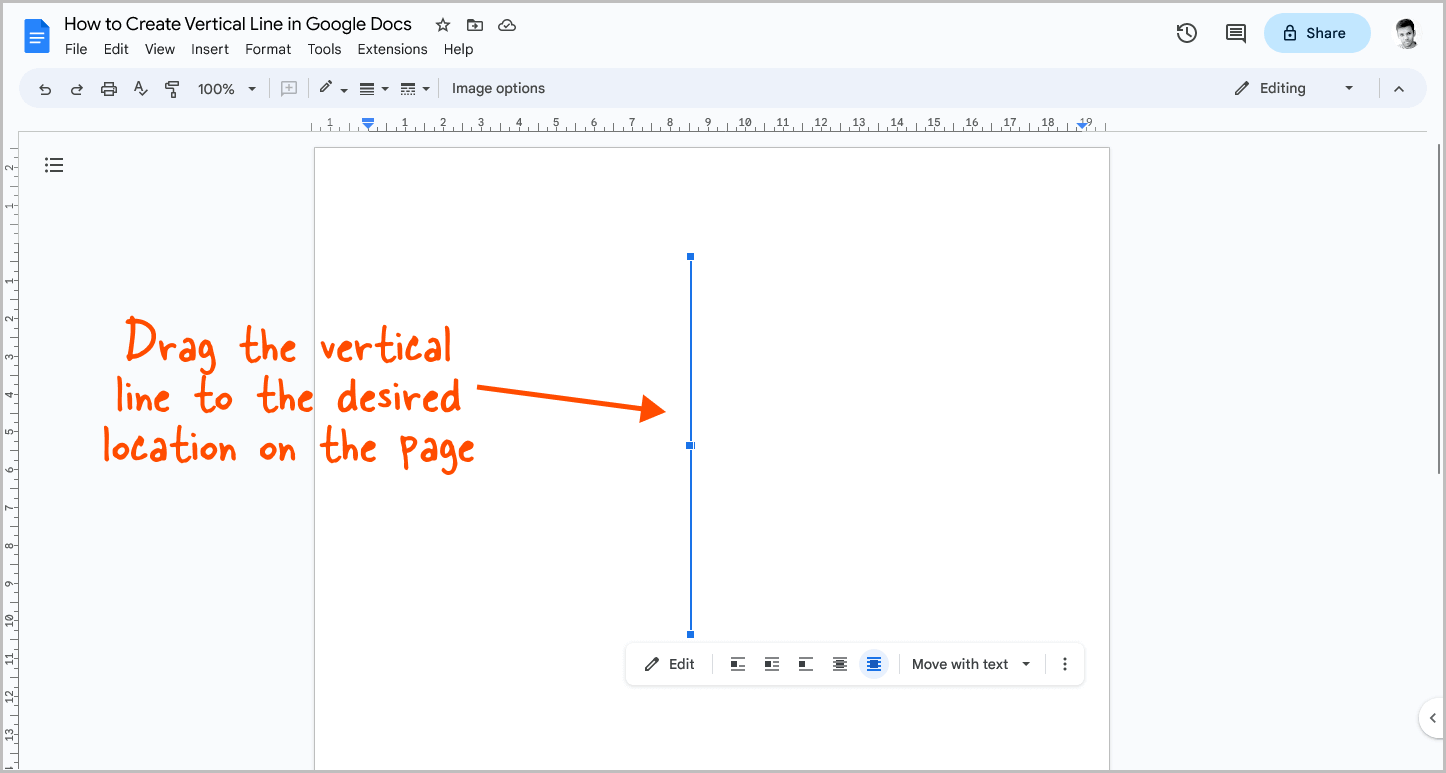
You can now close the “Image options” panel.
Next, click on the vertical line and finally drag it to any location on the page.
FAQs
How to Draw Vertical Line in Google Docs?
To draw a vertical line in Google Docs, go to Insert > Drawing > New, select the “Line” tool, draw the line, and click “Save and close” to insert it into your document.
How to Add Vertical Line in Google Docs for Resume?
To insert a vertical line in your resume using Google Docs, you will need to use the Drawing tool. Open the Drawing tool, draw a vertical line, and then insert it into your resume.
How to Add Small Vertical Line in Google Docs?
To add a small vertical line in Google Docs, use the drawing tool.
How Do I Insert a Vertical Line Between Columns in Google Docs?
To add a vertical line using the Drawing tool and insert it in your document, click on it and choose “In front of text”. Then, simply drag the line between columns.
Summary
Adding a vertical line in Google Docs is a simple process that can be done in just a few steps.
Follow these easy steps to create a vertical line in Google Docs:
- Go to Insert > Drawing > New
- Select the “Line” tool from the drawing toolbar
- Hold down the Shift key and draw a vertical line
- Click on the “Save and close” button
- Click on the three dots and select “All image options”
- Select “Size and rotation”
- Uncheck the “Lock aspect ratio” box
- Adjust the width and the height of the line
- Click on the “Text wrapping” settings
- Choose “In front of text”
- Drag the vertical line to the desired location on the page

